Showing posts with label Punic Wars. Show all posts

Sunday, 28 March 2021

Allied Triari

Sometimes I buy figures just because I like the ethos of a company or I am wanting to show some support for a smaller commercial project. Agema Miniatures falls plum into that category without a doubt. I do not especially need any more Republican Roman figures in 28mm but I appreciate the spirit and historical approach of Greg's company. So of course I bought all of the packs of metal figures that were produced to supplement the plastic offerings. The plastics are nice and well-proportioned but a little bit limited in their number of poses, so doing extras in metal made a lot of sense. 


Once I had the figures in my hand the "Wow factor" took over. These are some of the nicest figures I have ever seen sculpted in this scale. Just superb little castings with amazing detail and very natural poses, both action stances and relaxed. I was particularly keen on the Triarii pack with the old veterans leaning on their shields and in a variety of more expensive armour types. Eventually I had to spoil it all though by adding my painting to the party! First I came upon a problem  The Agema plastic Triarii match the metal additions perfectly for physiology but they are all in the classic kneeling pose. Totally not going to mix in with the stood up versions. My solution was to hack up some of the other plastic legionaries so that they could be adapted to carrying the Triarii's typical spear armament. 


(Click on image for larger version)


It works okayish... I had to steal some arms from Victrix plastic  figures which was altogether a nuisance. However the good news is that the new Hannibal's Veterans box of plastics from Agema will provide additional bodies and spear arms that will do the job perfectly.


Just for the record the figures, counted from the left are: 4, 6, 7, 12, 13,15 are Triarii Characters, 9, 10, and 11 from Maniple Command, 2, 3, 5, 8 and 16 are plastic figures from the Legionary box, (3 and 5 with heads from the Roman Allies pack of heads.) Figures 1 and 14 are interlopers that have been lurking in the lead pile for a very long time. They seem to fit in okay. They were I think from a company called Alban Miniatures possibly now a part of Matchlock / Minifigs. Apart from the last two all these figures are available direct from Agema at http://agemaminiatures.co.uk/product-category/republican-romans/metal-figures/

Legions Assemble

The motivation to get my Punic Wars Romans up to strength has been given a big boost (more like a jolt from a defibrillator I have to admit) by the announcement of the SOA Battle Day next year being Telamon. I have now finished the second Roman Legion in my army (Legion III) and I will be able to move on to the Allied "wings" forthwith.


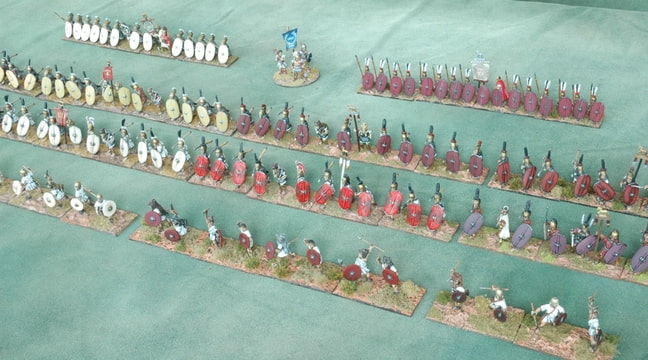
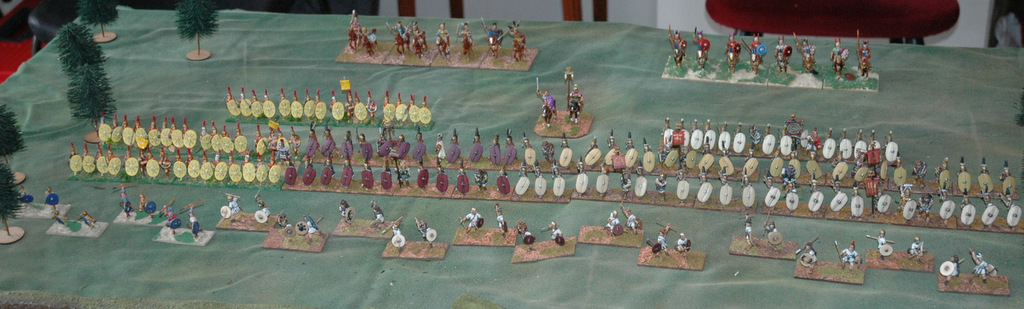
Here are the two legions deployed for combat in their distinctive Triplex Acies formation. Light infantry Velites are at the front and then in order: Hastati, Principes and Triari at the back.  The Piquet version of this formation is made up of 7 units of foot and one of cavalry (not shown.) The right hand side of the formation above is the newly completed Legion III.


The bulk of these figures are the excellent Wargame Foundry range. Still some of the nicest figures for this army available and in a huge number of poses and variants. If any faults could be picked upon some of the poses cause the pila and shield to clash when you are trying to glue them in place. These figures are at the small to medium end of the range of Republican Romans now available (see my comparison pictures here) but they are still one of the most accurate, nicely proportioned and have lots of subtle variants in armour and helmets without feeling the need to show every quirky variant from 200 years span and 1000 miles radius of Rome!


I have mixed in command figures from just about every range there is: Newline, Magister Militum, Gripping Beast and Crusader. The Velites are even more of a mixed bag with additional volunteers from Essex Miniatures, Irregular and Victrix. I am trying to strike the balance between a regular citizen army and one where much of the equipment was provided by the individual or arranged on a local basis. Thus the different shades of a basic shield colour within each legion.


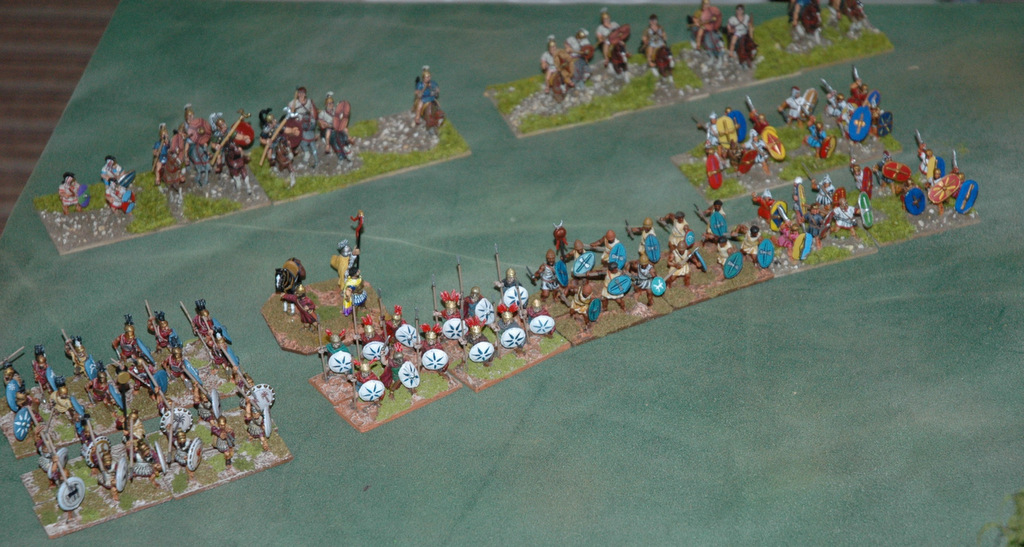
With the Allies I will take a more varied approach. Each contingent (Piquet unit) will have their own shield colours and some of them blazons as well (I am going to try out some Greekish transfers for those with a Hellenistic heritage.) Hopefully they will be distinct from the Romans but still clearly belonging to the same army. The figures will be a mix of more Foundry (for the long term Romanised Allies such as the Latins) and Oscan and Samnite figures for some of the more recent Allies. A fair few of these to do for Telamon including a big cavalry contingent. Even scaling the battle so that our usual legion represents 2 in the game, we are looking at over 1000 figures just for the Roman side! 

Thursday, 18 March 2021

Truceless War Campaign - Ambush at Hippo Regius

 Following the disastrous defeat of Hanno the Great at Utica, it was with some hysteria that the citizens of Carthage heard the news that another of their stalwart allies, the city of Hippo Regius, was suffering disorder in the streets. Different political factions were arguing violently over the future of the town. Predictably the rebellious Mercenary captain, Mathos the Libyan, had taken this opportunity to march his army there. Blockading the town and lending weight to the faction sympathetic to the Mercenaries.


Voices were raised in Carthage demanding that another loyal ally not be intimidated into the enemy sphere. The generals currently in Carthage, Hanno the Great, Hamilcar Barca and Hannibal (the Elder) were forced to accept that working together would be vital to prevent another military disaster. Despite their festering personal differences Hamilcar and Hanno agreed to cooperate in a scheme to come to the aid of Hippo Regius.
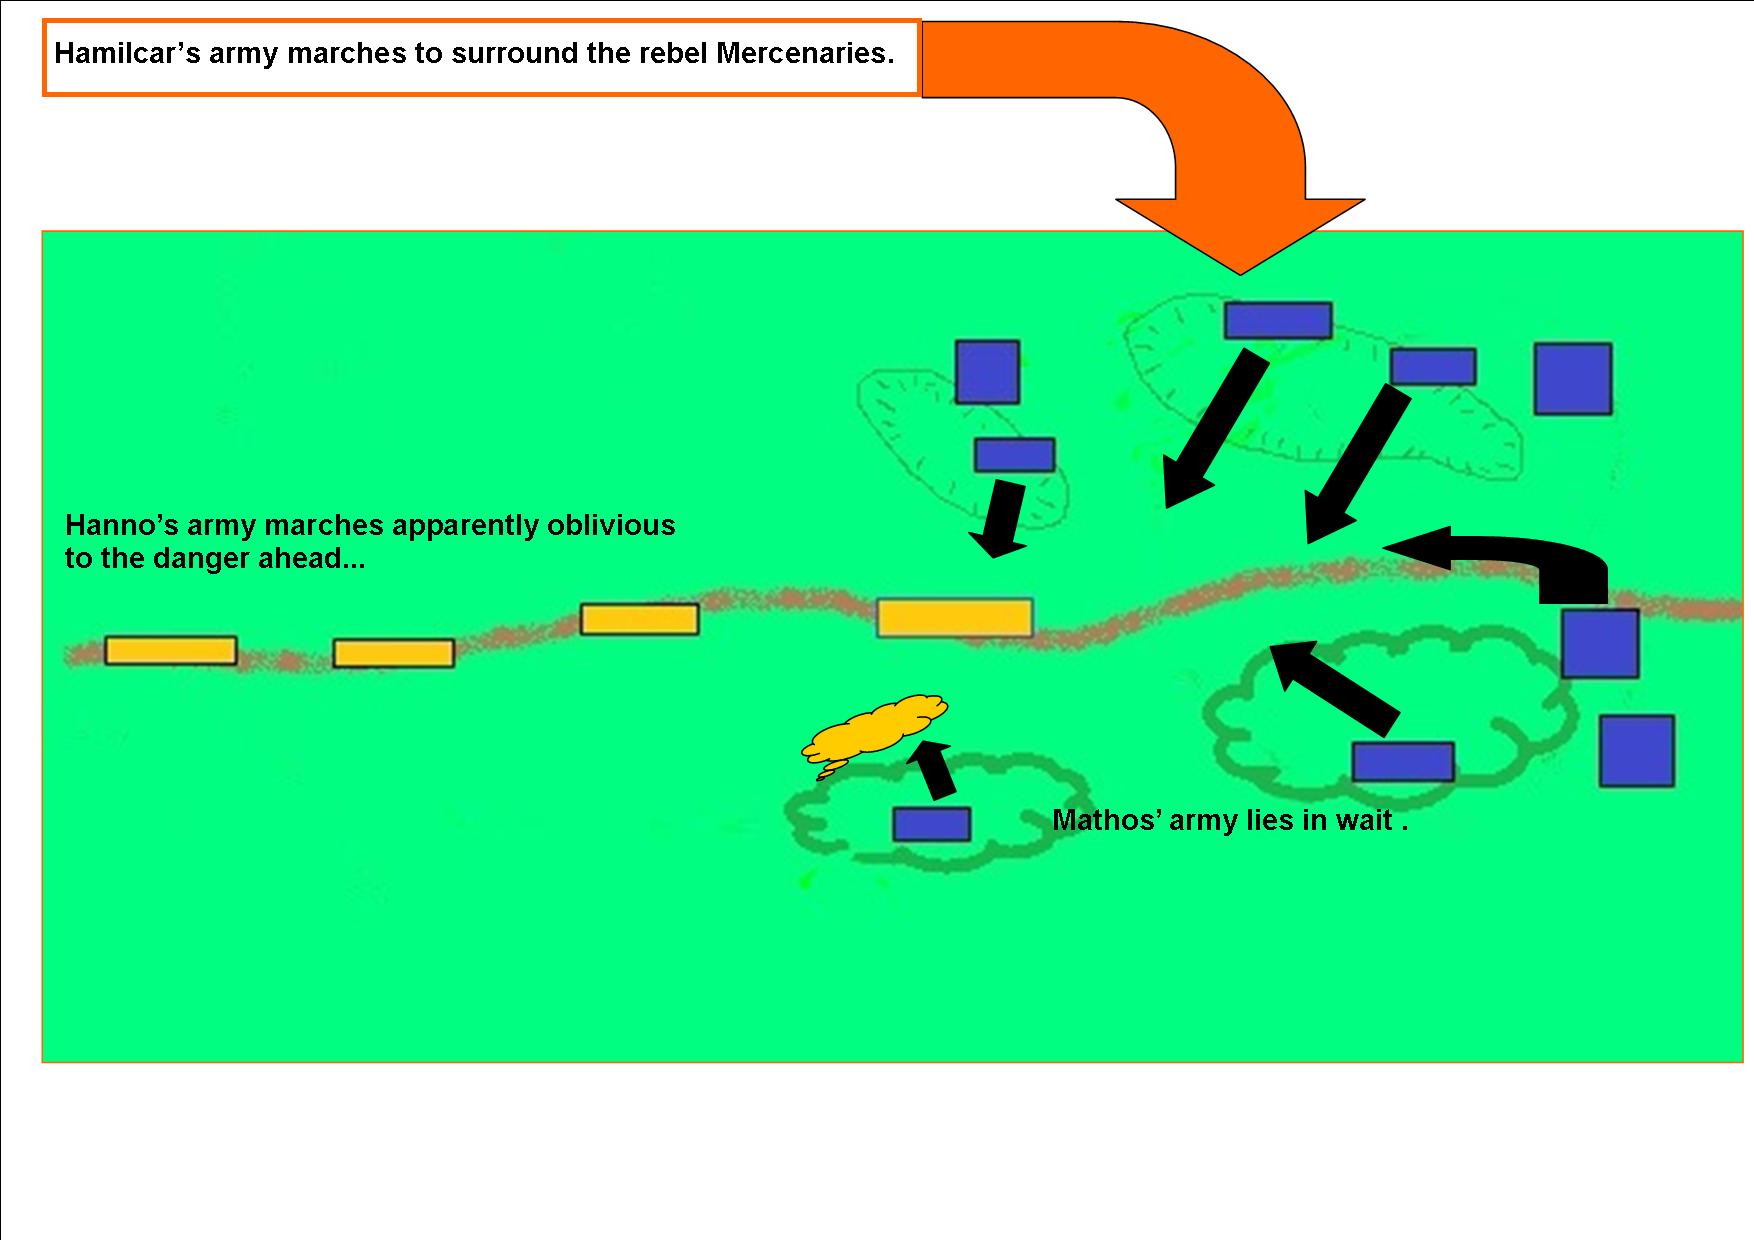


Their plan, not only to break the siege but to destroy one of the rebellious armies plaguing Carthage, was that Hanno would march on Hippo Regius with a small force, which would tempt Mathos to engage, in the hopes of another easy victory. Hamilcar with a larger army would surround and destroy the Libyan rebel, when it was too late for him to change his mind and retreat. The scheme worked better than they could have hoped. Despite spies reporting to Mathos’ colleague, Spendius, that there were two armies heading west from Carthage, the Italian mercenary general decided not to bother sending a warning. As they approached Hippo Regius, Hanno’s deliberately poor reconnaissance allowed the enemy scouts to get close to the marching Carthaginians and report to Mathos exactly what was approaching. Mesmerised by the apparently clueless marching army of Hanno, the Mercenaries did not spot the following army of Hamilcar.


Mathos determined to not only beat Hanno but to totally crush him. Sending his Numidians to find a likely ambush location, he took most of his army there, leaving just a skeleton force to carry on the blockade of Hippo Regius. Mathos’ scouts did now report the presence of Numidian cavalry nearby, who must belong to a force other than Hanno’s army (which clearly contained no Numidians.) Mathos was too intent on his impending victory however, to comprehend the significance of the information.


 Hanno's army marches into danger.


Hanno the Great, desperate to repair his reputation after the debacle at Utica, pressed forward along the road to Hippo Regius, knowing that he could encounter a superior enemy at any moment. However he dared not take obvious preparations for battle, in case he alerted the rebels to their danger. As Hanno’s army neared the ambush location a small band of levied Africans was sent to scout the woods along one edge of their route. The rest of the army however pressed forward in their extended march columns, terribly vulnerable to an enemy hidden so close to their flanks.


It can only be speculated what caused the ambush to be sprung too early. A group of Numidian horsemen plunged out of the cover between the trees and charged down the road towards the marching Carthaginians. Maybe it was simple indiscipline by the soldiers or a loss of nerve by their commander. Possibly on a subconscious level Mathos suspected there was something not right in the situation and decided he could not risk waiting for the enemy to be in a more perfect position for the ambush. The launch of the attack at this juncture probably saved the life of Hanno, as he was near the rear of the march column.


 Rebel Celts and Libyans, (sporting tall white feather plumes) surround and destroy the loyal Celts of Hanno's army.


Despite the bulk of the Carthaginian army having not yet reached the defile between the hills and the woods, the vanguard was caught right in the teeth of the prepared surprise attack. The African levies were hurled back from the woods as elite Celtiberians swarmed out to attack the flanks of units presented to them. Hanno’s hired Celtic warriors found themselves beset on all sides and despite brave charges by the cavalry, initially dispersing the Numidians, the position was hopeless. Hanno flung his citizen militia down the road in an attempt to help the doomed vanguard but the wide intervals between units as they deployed from march order prevented them from properly supporting their comrades. A brave stand by the lowly African levies and some of the Carthaginian militia did buy enough time that Hanno was able to direct the remnant of his force into the fight. The Mercenary’s success was finally halted as Hanno’s elephants entered the fray. The Mercenary cavalry unused to facing these noisy smelly beasts panicked and ran, elephants in hot pursuit.


 Carthaginian militia advance to try to aid the doomed vanguard.


The check to the enemy gave just enough of a respite to save Hanno’s small force. Hamilcar had had no choice but to march several hours behind his colleague’s army. Not only that, but to avoid being detected he was not able to aggressively scout out his enemy’s deployment. Hamilcar had to send his army at speed and blindly toward where he thought Mathos would be. Luck was with Hamilcar as not only had Mathos  positioned no rearguard but the Libyan general was alone and in the path of the swarm of Hamilcar’s light cavalry that came charging out of the hills. The fierce Numidians attempted to capture Mathos, but despite having his horse killed beneath him Mathos was able to fight his way clear and join a group his own cavalry waiting to join the battle in the defile. The arrival of friends brought new energy to Hanno’s soldiers and where spirits had been sinking, they now rose again. Hanno brought up the rest of his elephants and bodyguard cavalry and moved to trap the Mercenaries; the hunters now being hunted themselves.


 Loyal Celt cavalry charge into the teeth of the ambush, through their routing comrades.


The situation rapidly became bleak for Mathos. The enemy Numidians that were pursuing him now peppered the cavalry he had joined, with javelins whilst some of their number attacked the flanks and rear of the heavy Liby-phoenician horsemen. This was more than they could bear and despite(?) the presence of their commander they finally broke, the survivors scattering. Mathos was forced to flee with them and it was only by luck that the victorious Numidians were not quite able to catch him in the general rout that followed.


A Visit to Wargames Foundry

 I was able to divert a journey a couple of weeks ago to go past the new home of Wargames Foundry near Newark. I found the pleasingly characterful and slightly dilapidated building (originally some sort of stable block for the nearby Stoke Hall) very easily, following the directions on their website. As I was strolling into the large gateway I encountered none other that Bryan Ansell himself and we fell into conversation. He gave me the tour of the new shop/ display area, and we had a interesting chat about the unreleased ranges of figures and different plans for the immediate future at Foundry. Bryan tacitly admitted that some of the previous administration's choices in commissioning new sculpts had been a mistake. Some of the miniatures are more Peter Gilder  in style that Perry twins. The other chap there was alo very friendly and helpful and none of this was very useful at preventing me from several impulse purchases. (Well they fed me tea!)


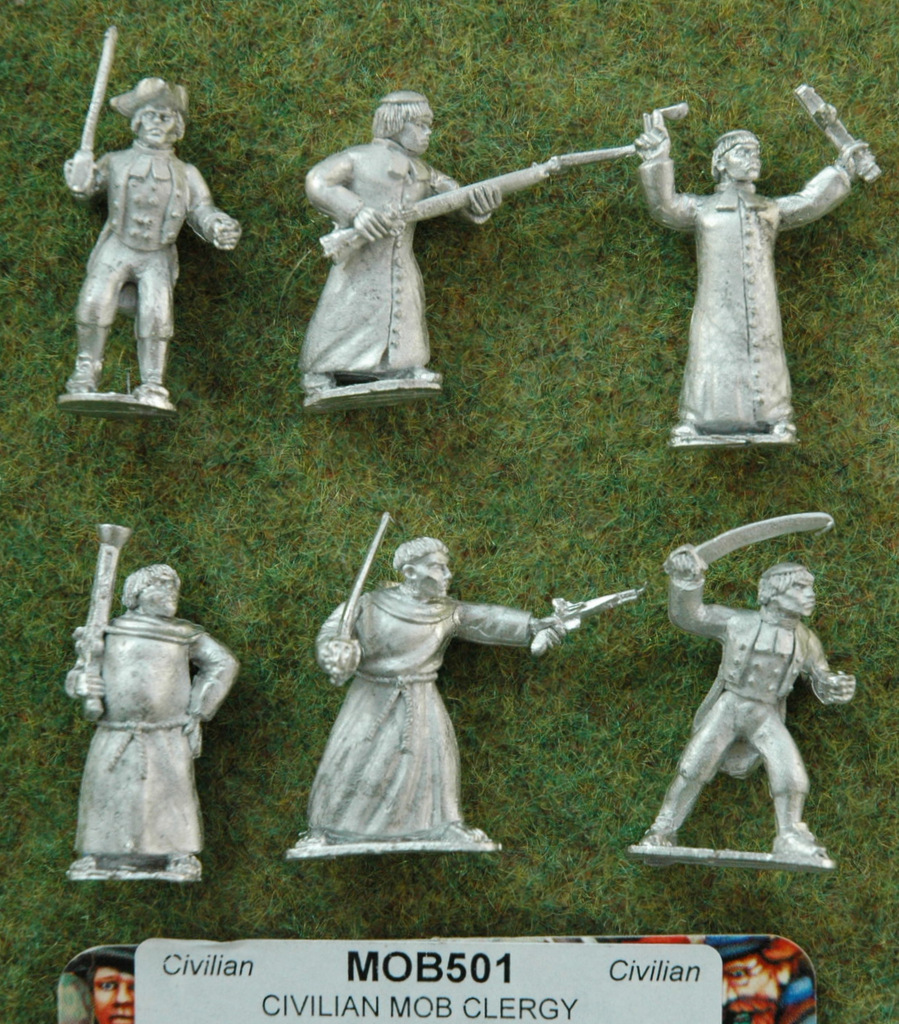
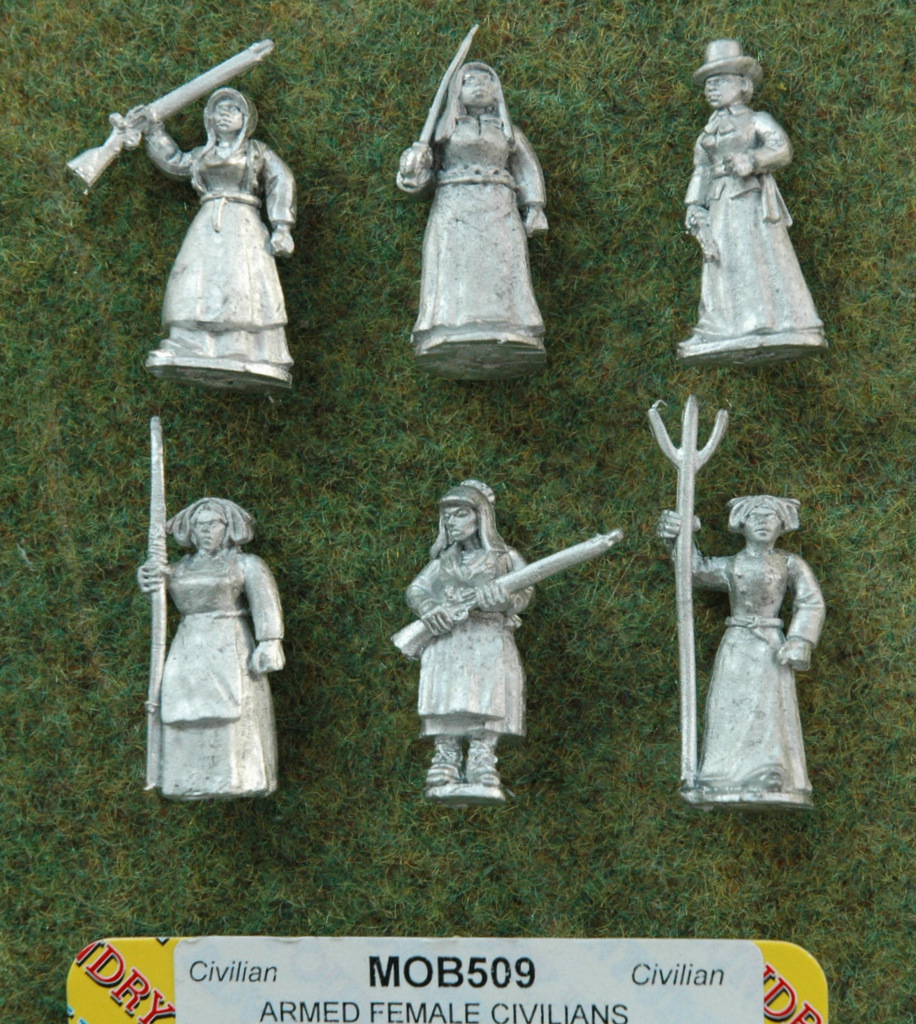
 One of the ranges that I had not seen before is a civilain "mobs" line. These are figures in vaguely 18th / early 19th Century garb, armed with a variety of improvised and some more purposeful weapons. There are loads (maybe 30?) packs including mounted civilians and civilian artillery. The style is relatively simple with reasonable proportions and should be easy to paint. I picked up a blister each of the armed women characters and the armed clergy, as the most unusual examples.


I can see a fair bit of use for these, in Donnybrook skirmish games if nothing else.


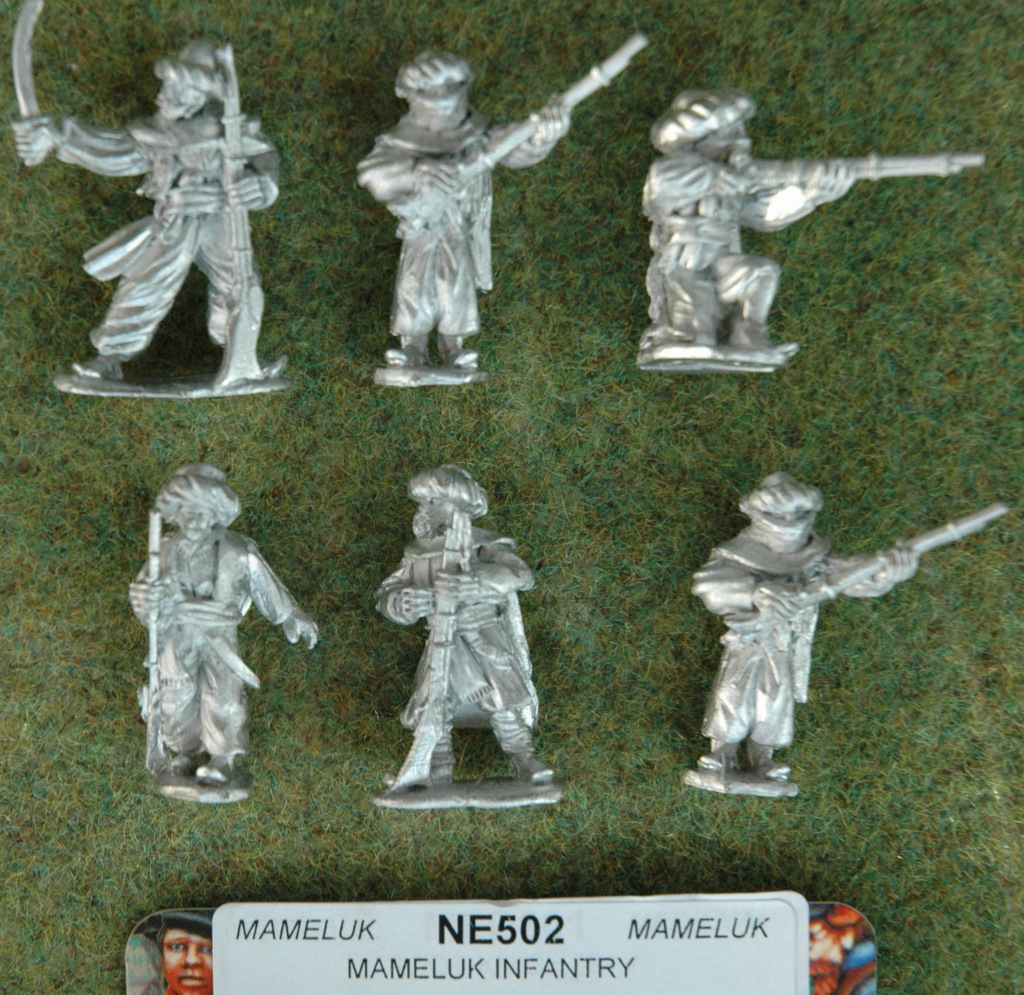
The other range that I hadn't seen much of (just a glimpse at Salute this year) was the Napoleonic Mamluk range. These have quite a chunky and dynamic style, if lacking a little in subtle detail. Quite an unusual subject though, I can only think of one other line (Brigade Games?) I like them and I will have a place for them in my 18th C. Ottoman army. At £2.00 a pop for infantry / £4.00 for cavalry (unless you buy enough packs to get the freebee deals) I won't be able to afford a lot of them.


The last of my impilse buys was chiefly acquired to enrage / get a laugh from one of my regular opponents, Les, who has owned a Carthaginian army ever since I can remember.


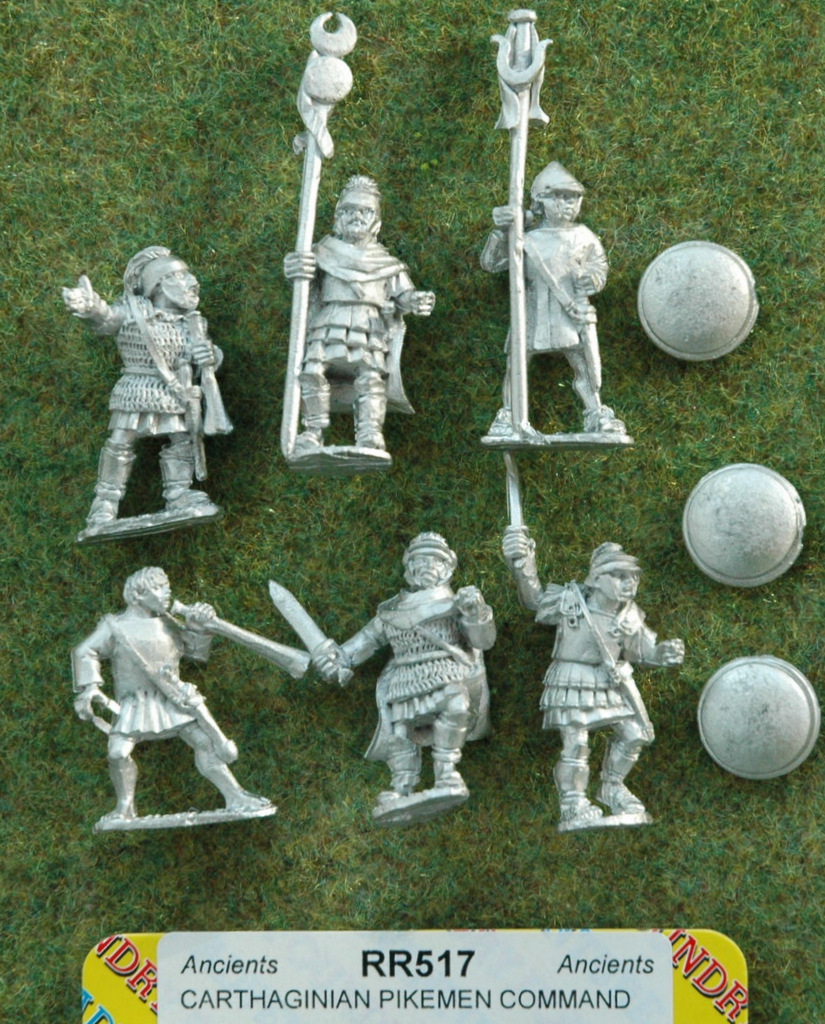
It was their title that had me chuckling! I don't know if these new "pikemen" are named for their counterparts in the earlier (Dave Gallagher?) range or nostalgia or just as an homage to the late, great Peter Connolly. (I didn't ask.) Generally the idea of a Carthaginian pikeman has been debunked, at least in wargames circles but I remain to hear that there is some new evidence that they existed... Again slightly rough and quirky sculpting but I will happily use these as alternative command figures in units (they have a bit of an old style Irregular Miniatures feel to them IMHO, but larger of course.) 

Tuesday, 16 March 2021

Republican Roman Comparison

 As a side-effect of my renewed campaign to finish painting (hah!) my Republican Roman 28mm army, I was reminded of my intention of some time ago to do a comparison article on the ranges of figures available for the army. Since then the choice has increased including two new plastic ranges appearing and the superb Aventine range steadily growing (in size and reputation.)


The following comparison photos will hopefully be useful for gamers wishing to decide on which range (or ranges) will suit them. And which can be mixed together. The photos speak for themselves but that won't stop me from adding my own totally subjective comments.  In the interests on full disclosure my own Romans are mainly Foundry figures (bought back in the Guernsey Foundry days - I know I know, what the hell have I been playing at all these years with them still unpainted...) I have also mixed in a large variety of other manufacturers command figures so that each of my units has a little variation and its own character. I am reasonably tolerant of different sizes of figures in the same unit and certainly on the same table in different units.


I cannot claim the following selection to be exhaustive; I have lots of Old Glory figures but their Republican Romans don't "do it" for me. Crusader Miniature have been neglected for no valid reason, Renegade Miniatures are not currently in production but their range is pretty poor. Relic Miniatures have an interesting Punic Wars range with great detail but slightly odd anatomy/ poses. Also their variable scales within a range just depresses and confuses me! (I would still buy some if they were on the correct side of the Atlantic. :) )


Relic (left) and Crusader (right)

Old Glory - Simply not their finest.


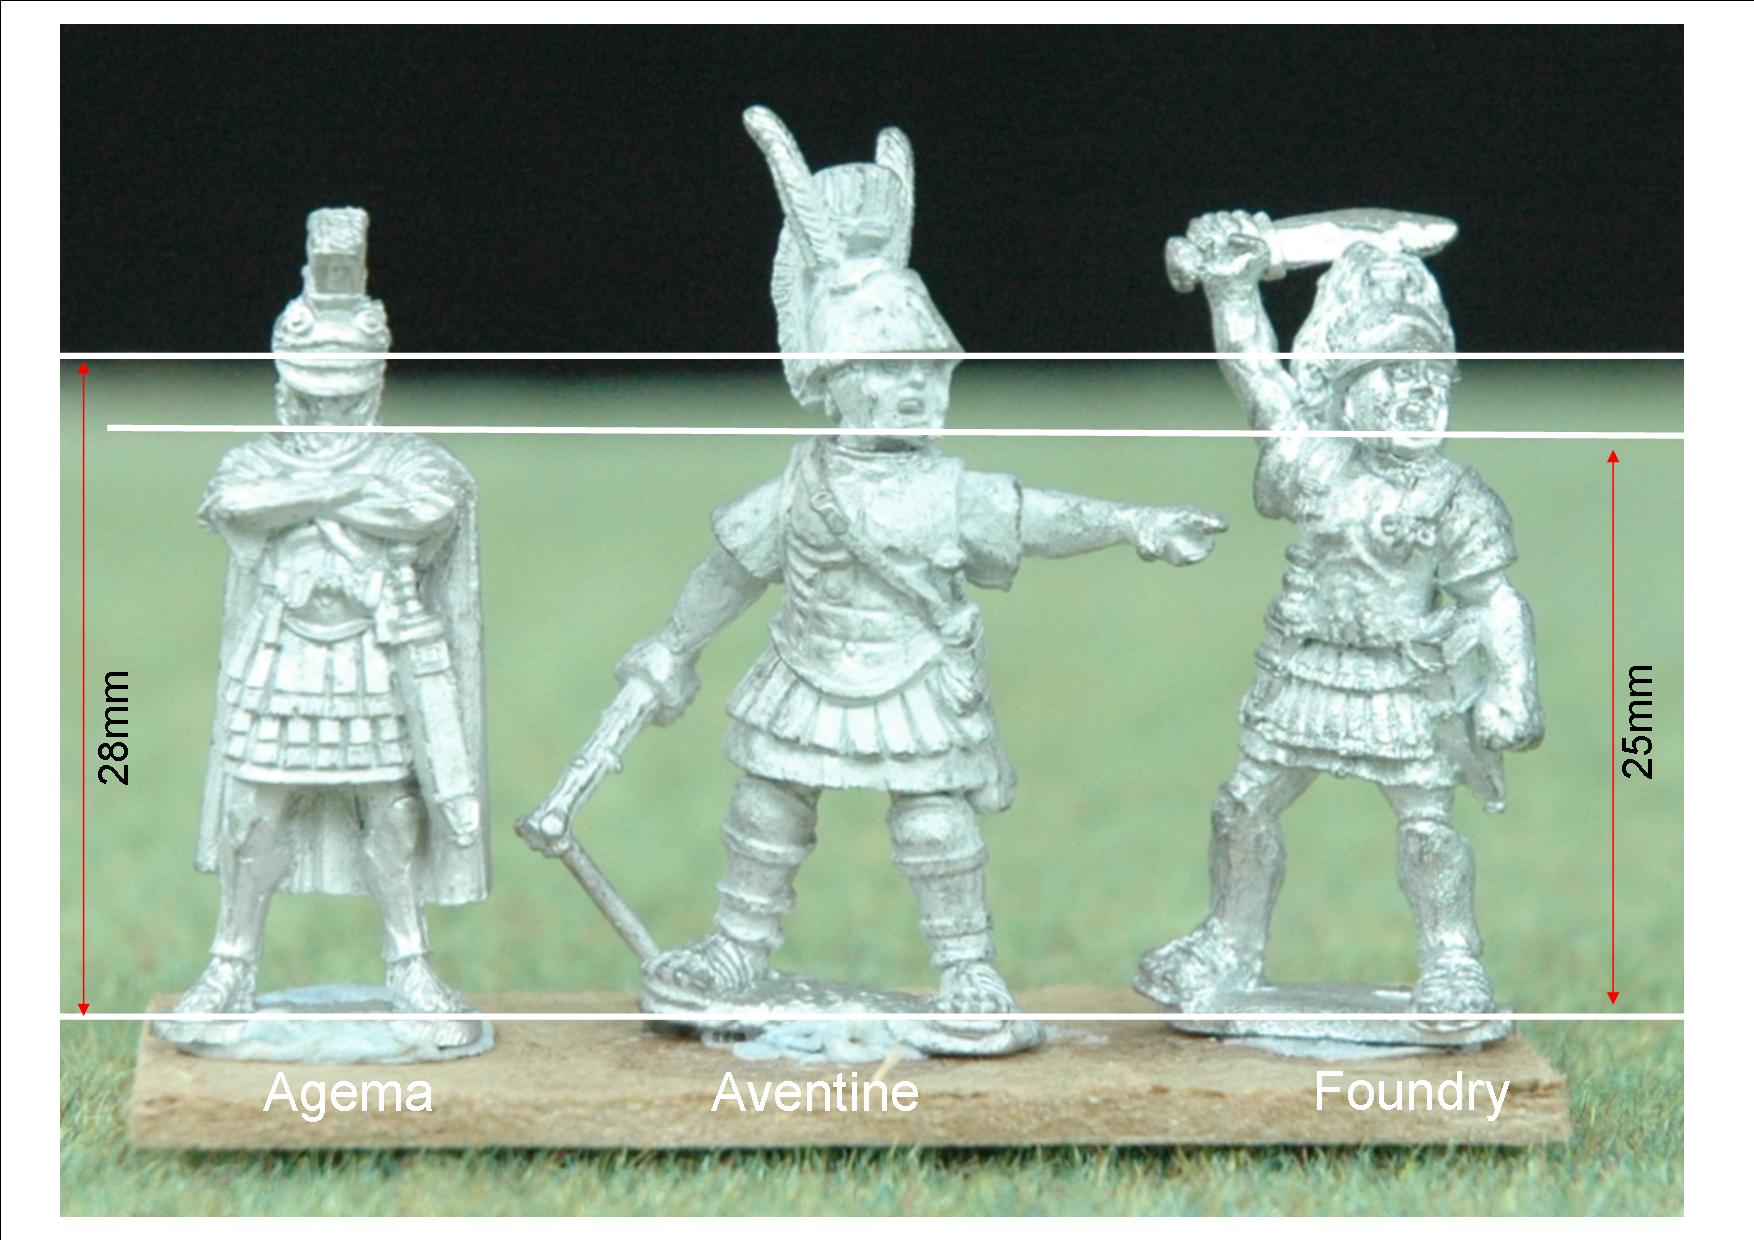
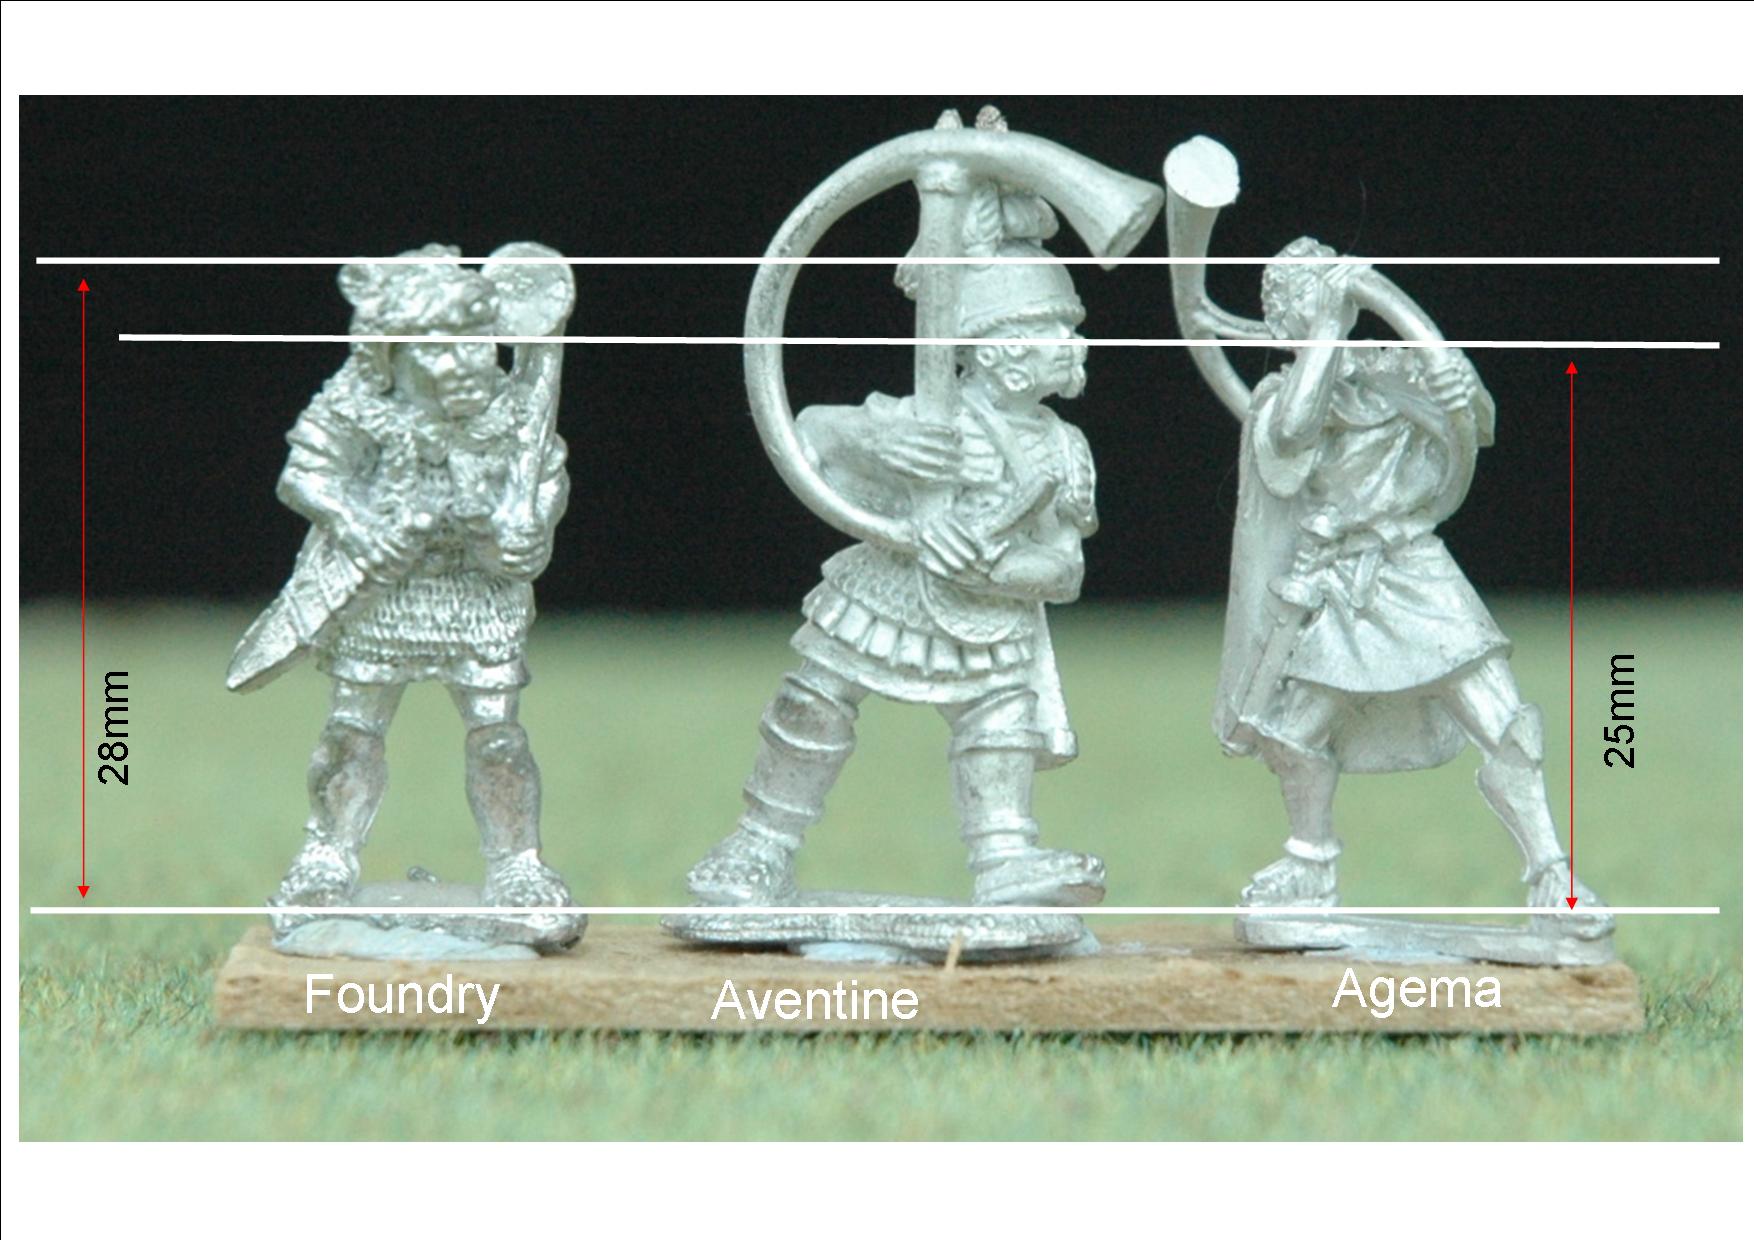
First up two of the newest lines (and arguably best) Aventine and Agema. Aventine are at the chunkier end of the spectrum and have lovely detail. I only have their Etruscans but they are close in the way they are equipped to early Romans so will do for showing the size and style of this manufacturer.  Agema are the first out of the blocks with Punic Wars plastic figures (as well as metals such as this one.) As usual click on the photo for a larger image.


The Foundry officer is a bit taller than the ""grunts" by about 1mm. The Agema figures are the tallest of this batch, 30mm in all but name. They are probably also the most finely detailed - superb sculpting. They are also the closest to real human proportions so don't look so out of place with smaller ranges.


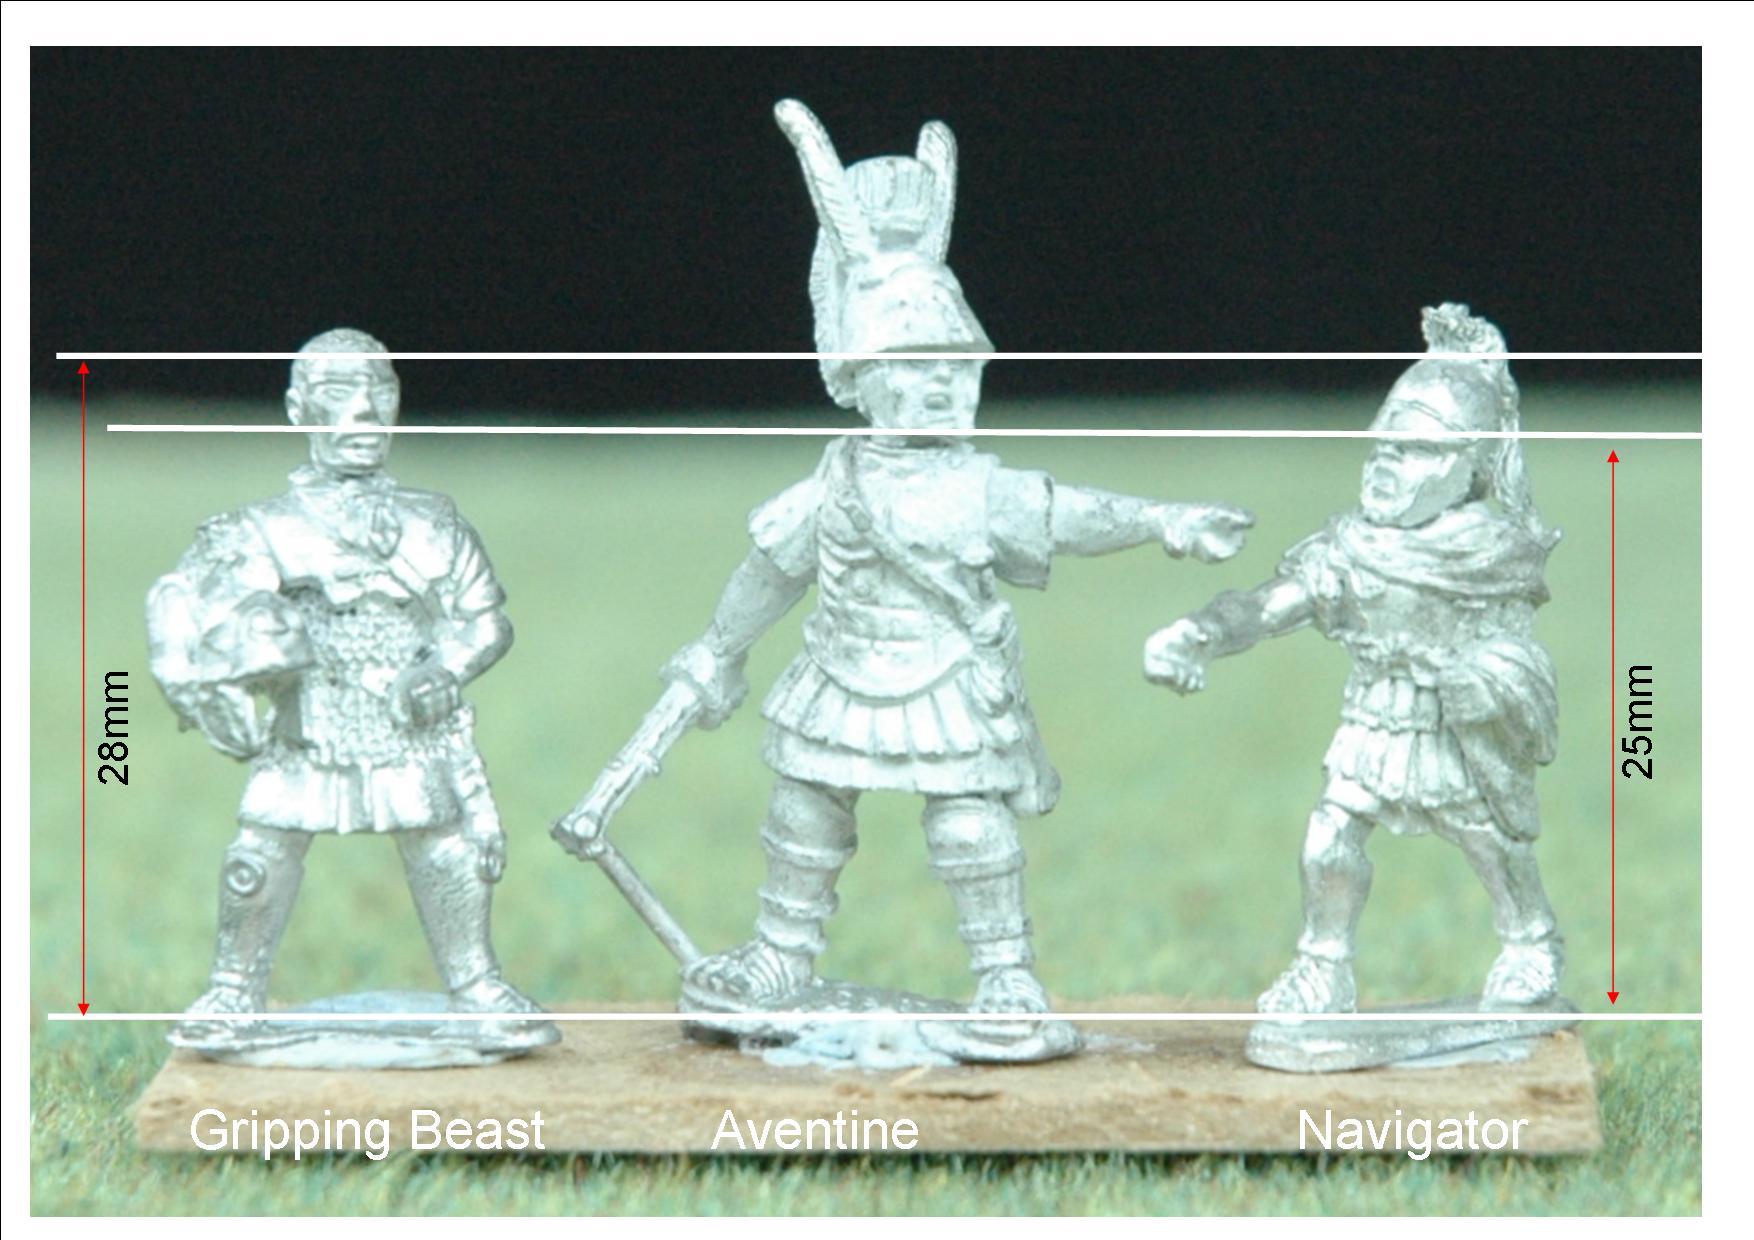
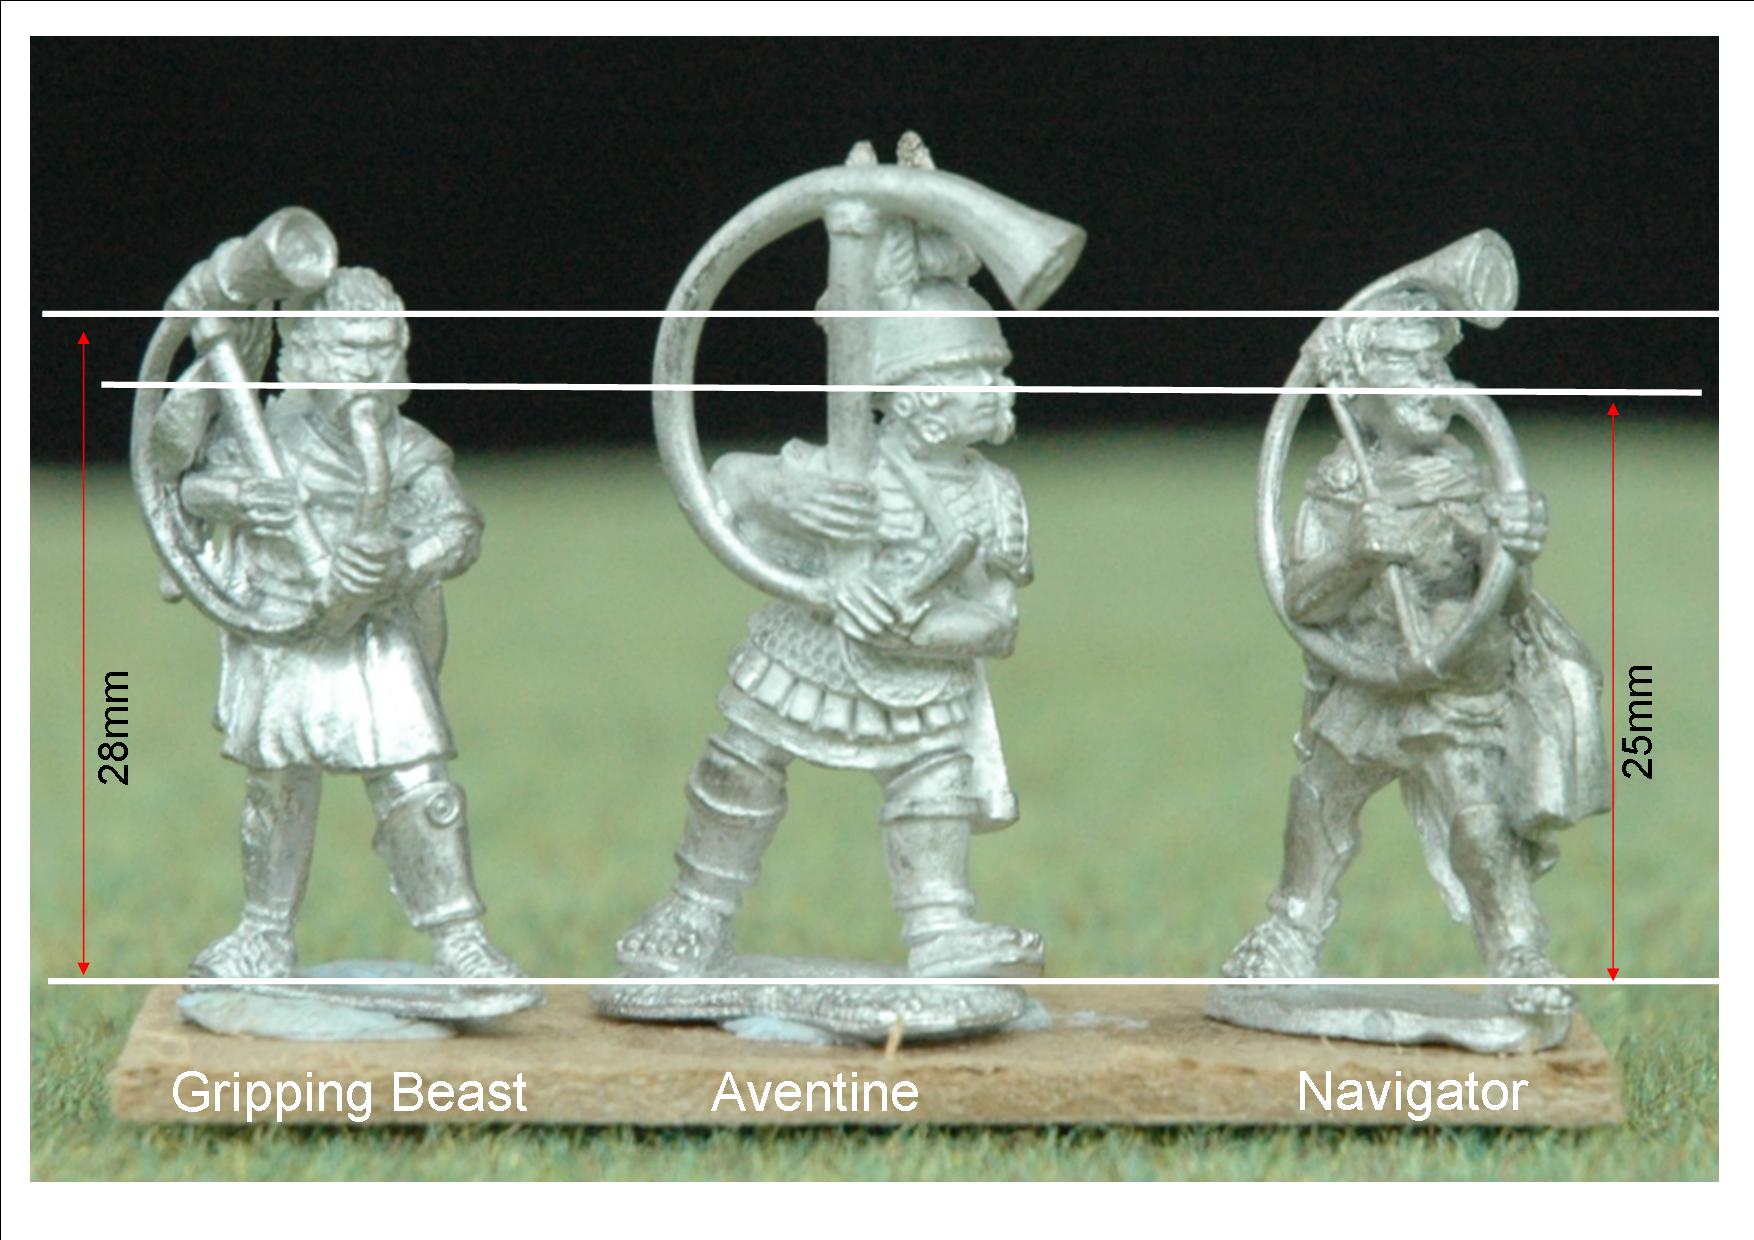
The Gripping Beast officer here looks a bit bobble-headed, but this is the exception in the range; the ones wearing their helmets are more in proportion. Navigator are now owned by Magister Militatum. This range is one of the shortest of this batch and the figures range from just about acceptable to excellent.


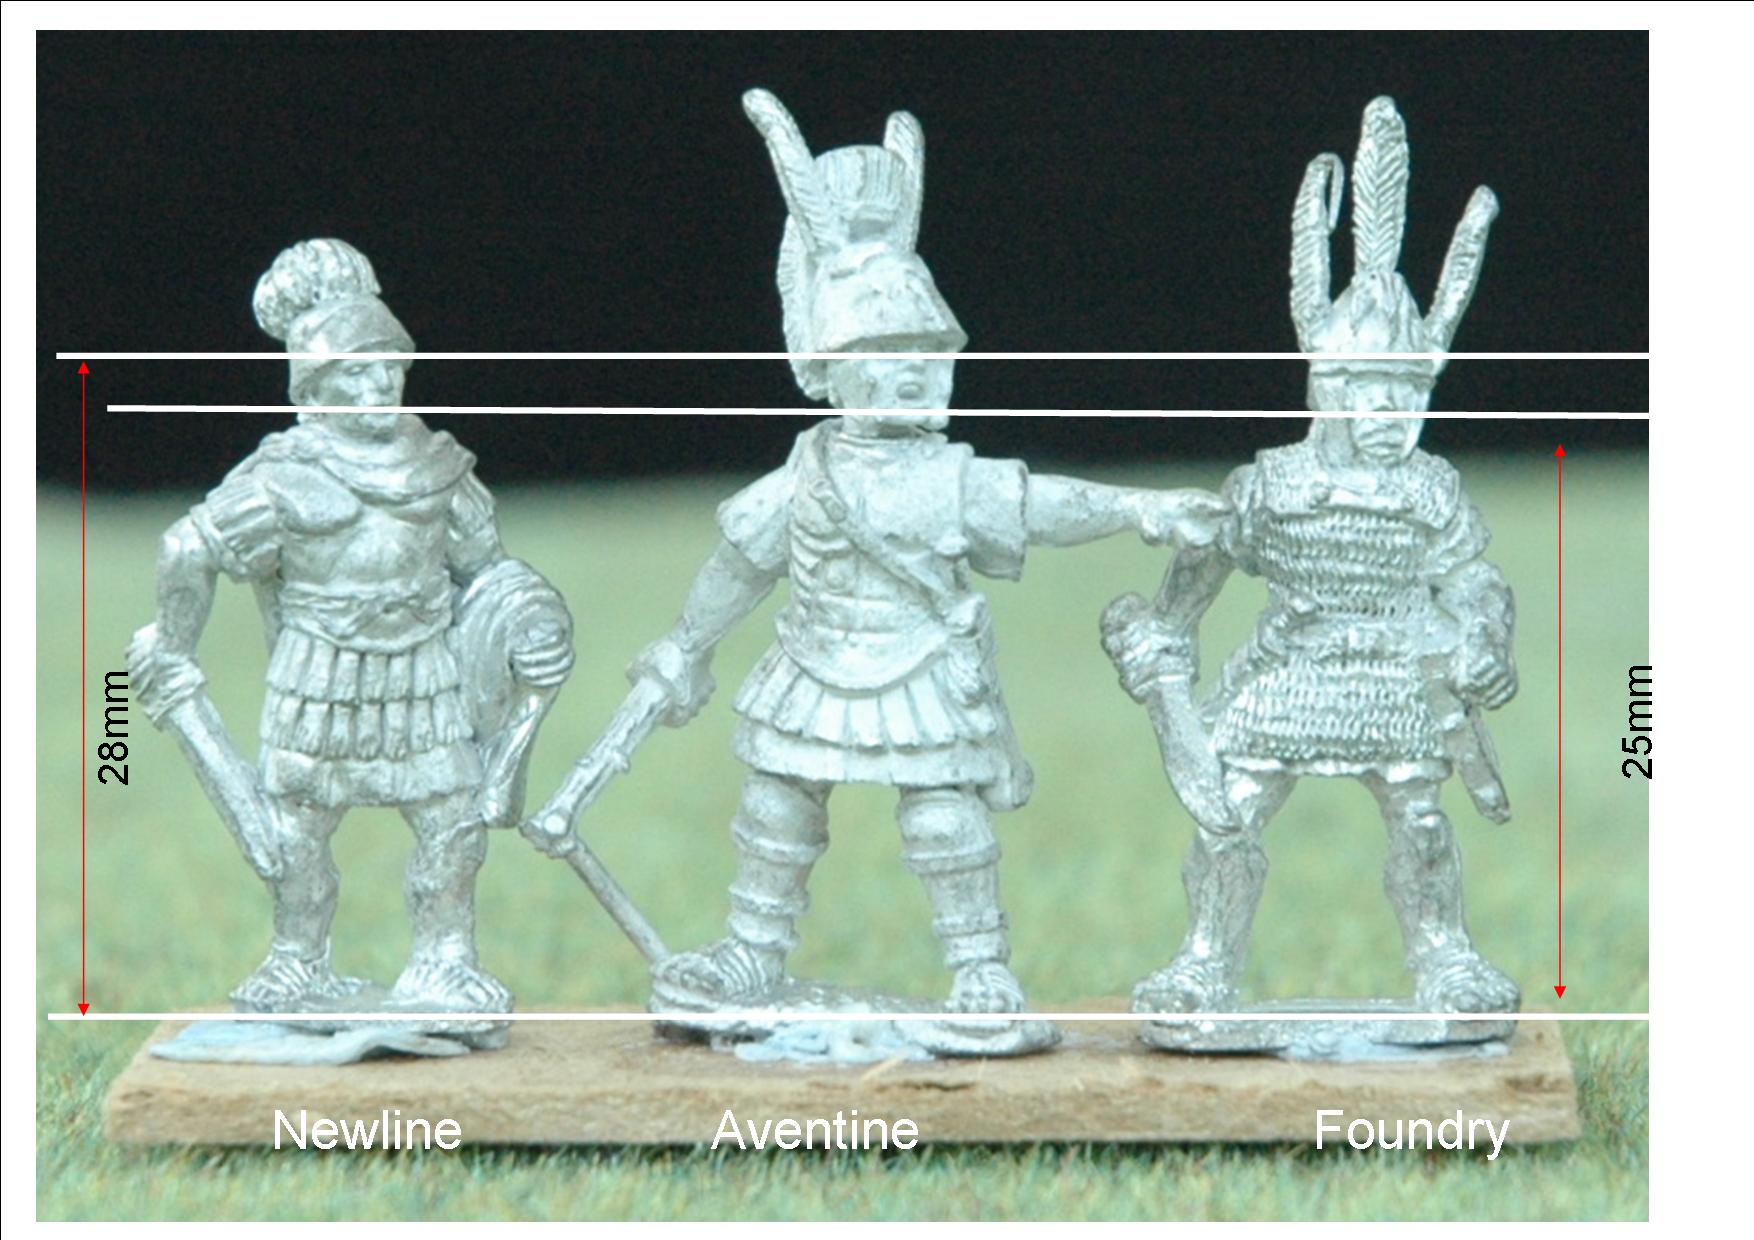
Just to be confusing the Newline Roman here is from the range now sold to SHQ Miniatures, http://www.shqminiatures.co.uk   Newline have subsequently produced a new Polybian Roman range which looks even better, probably around the same size but I haven't had a chance to measure one. The second Foundry officer looks like he would mix in with Aventine quite well. I am a bit surprised by that.... (I may have to do a comparison on the rank and file figures to see how those match up.)


These first three musicians show off again the great detail on the Aventine figures and the terrific posing of the Agema range. The Foundry hornist (?) has the animal skin helmet cover/cloak that is to my mind more of a later style. Here the Foundry figure can be seen to be significantly shorter.


I do like the little details on the Gripping Beast figure like the puffed cheeks ready to sound his horn and the decoration on the greaves. The Navigator version is almost identical with nice fine detail, very easy to paint.


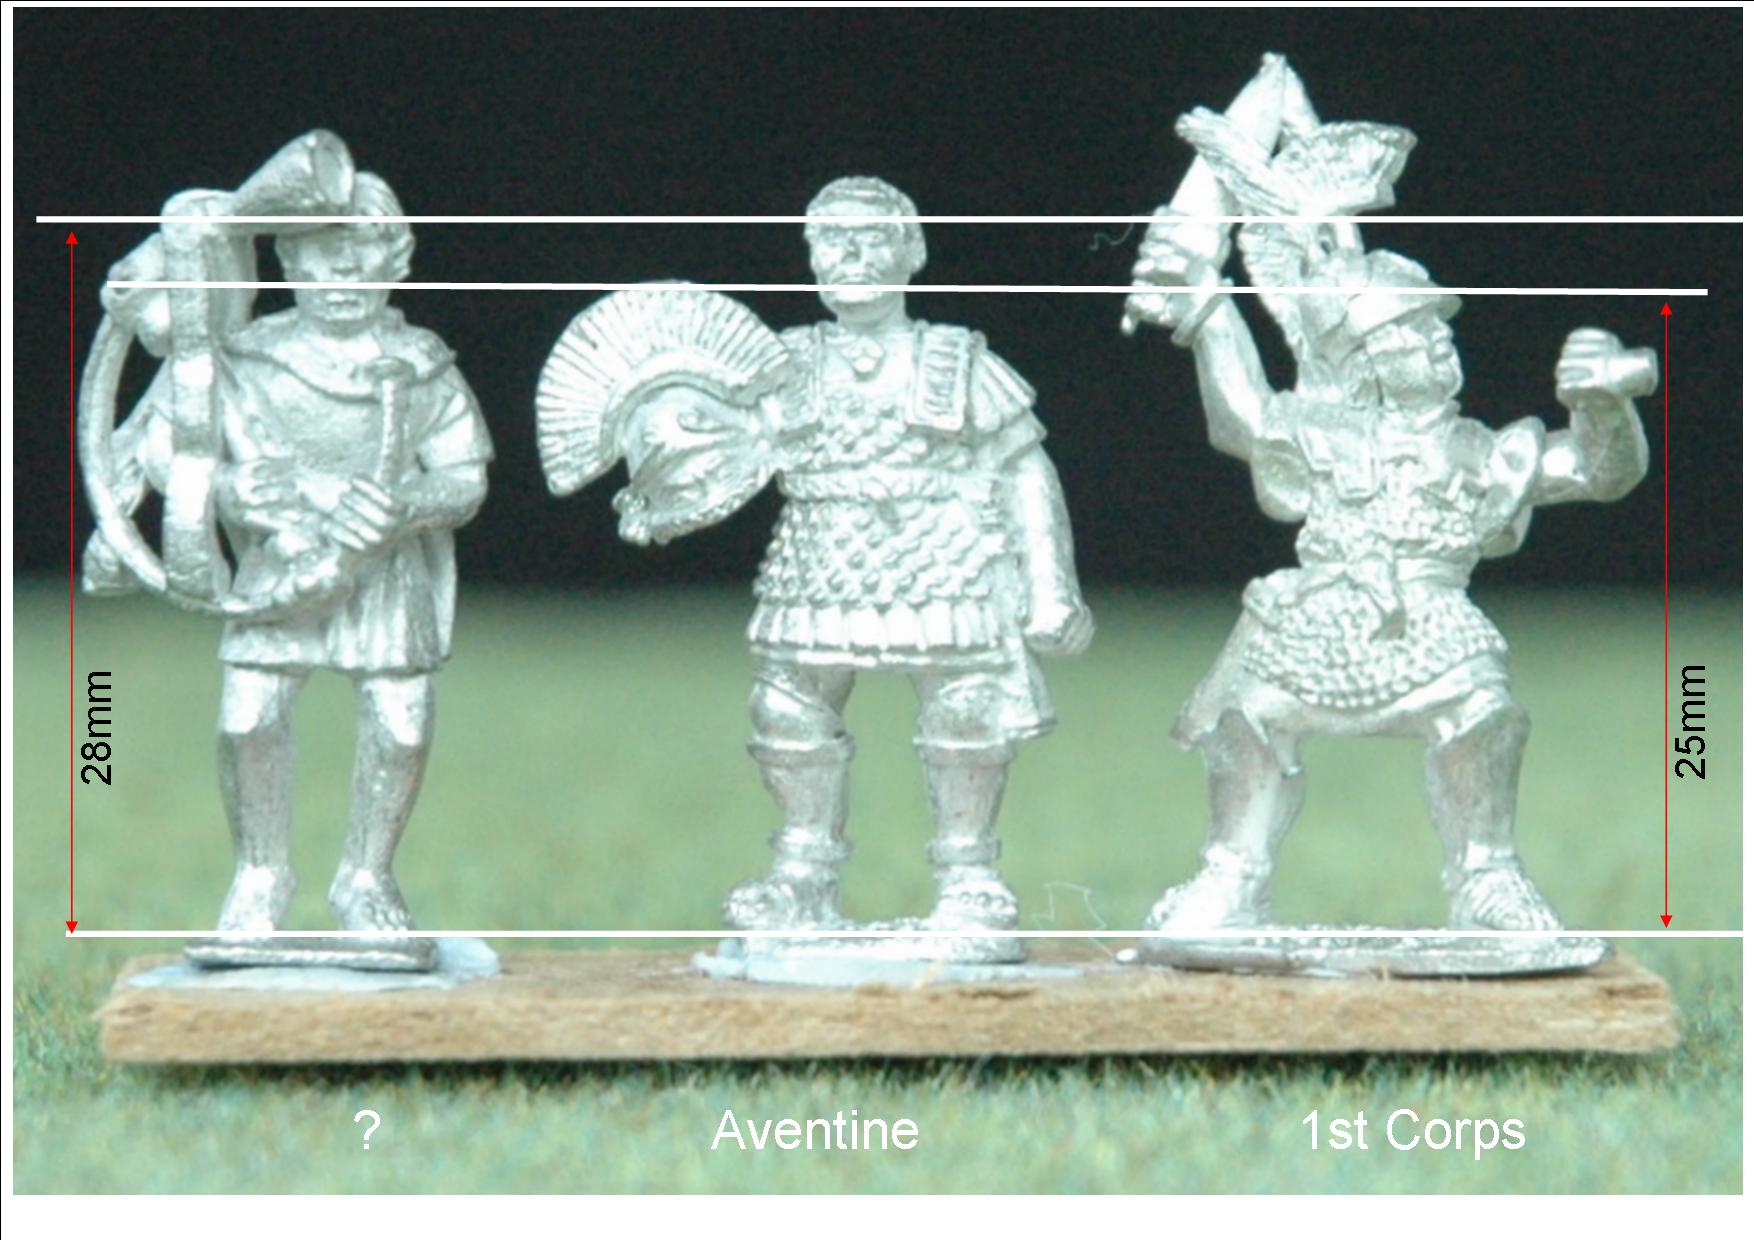
This last horn player I cannot for the life of me remember the make of. A shame as it is a very nicely sculpted miniature. With him is another Aventine Etruscan and a 1st Corps Roman officer. The 1st Corps figures are beautifully cast with good clear detail, maybe a little stylised in pose but full of action. I think they don't look put of place with their taller Aventine cousins, due to their similarly stocky build.


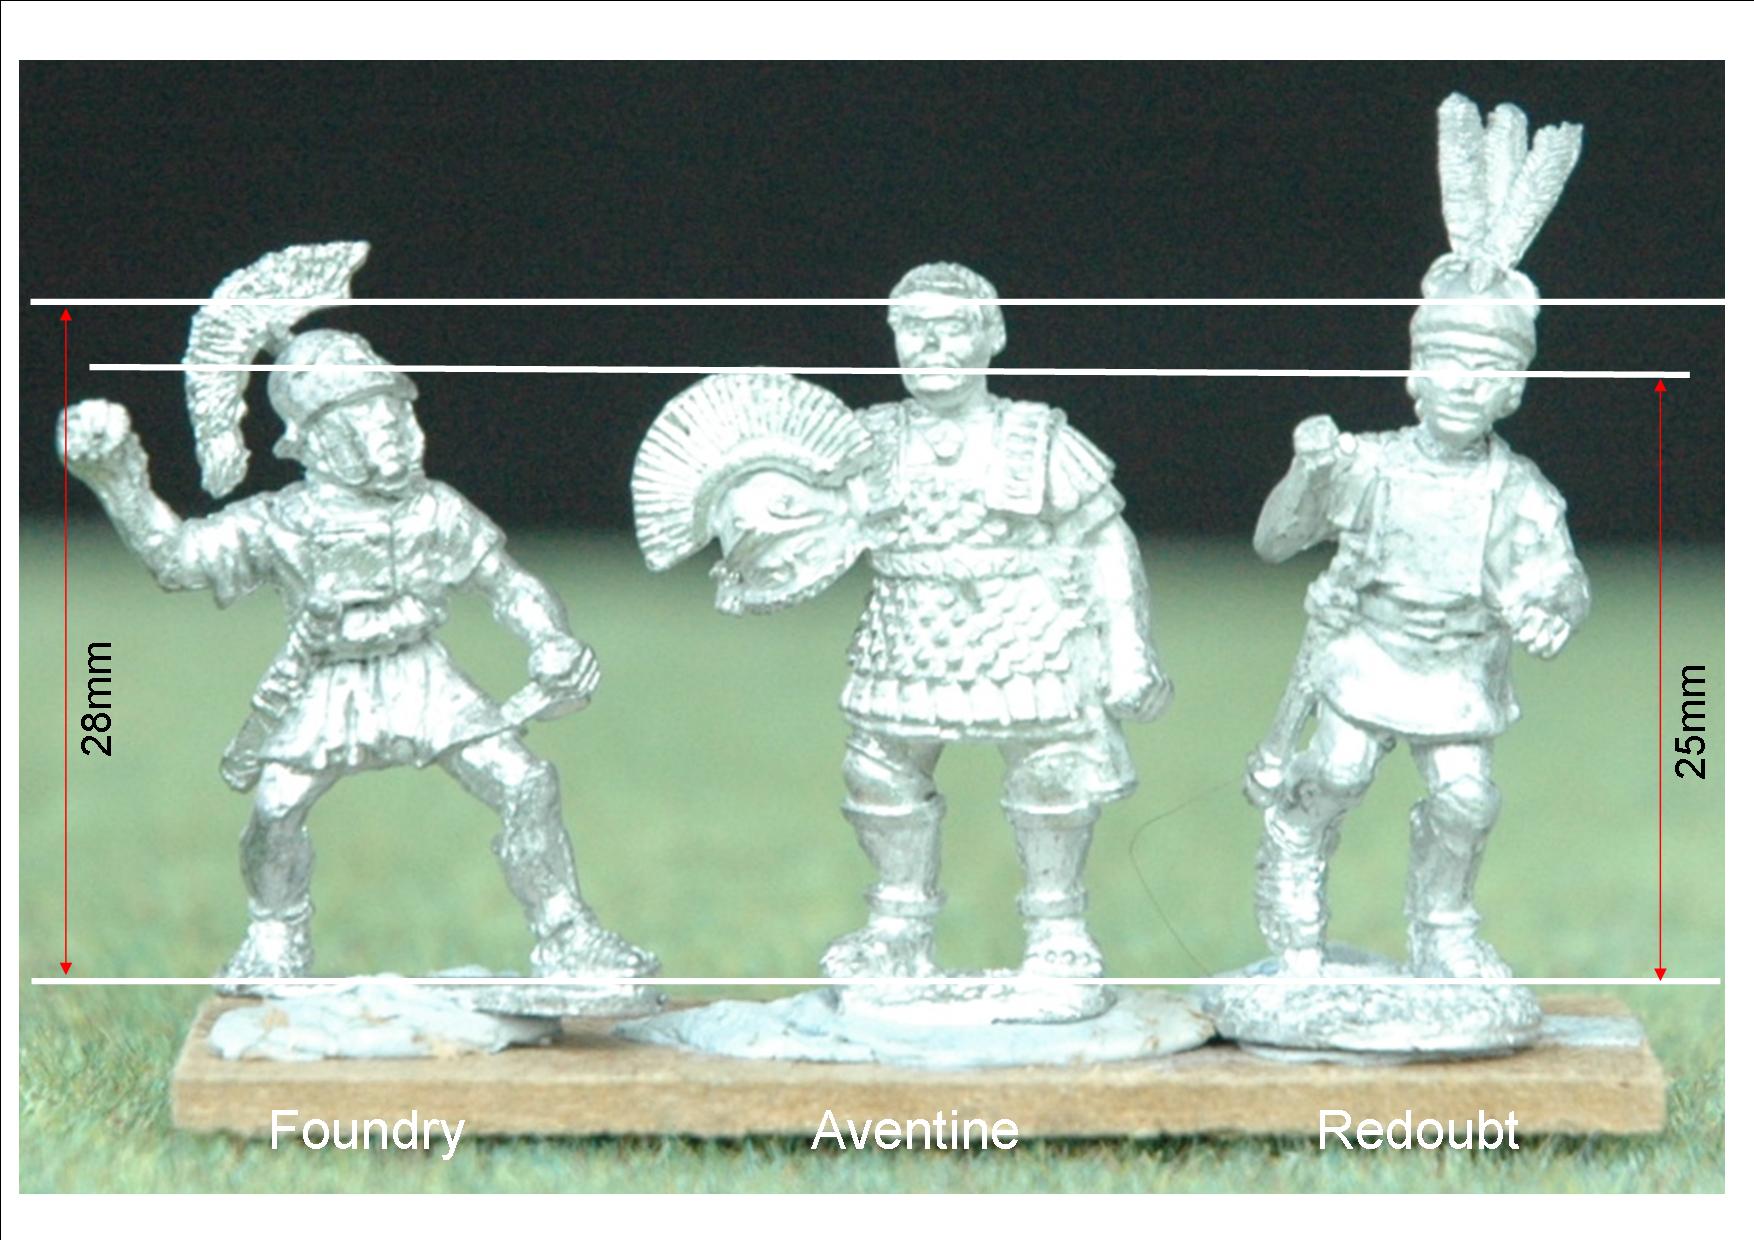
I decided it was worth showing a typical Legionary from Foundry next to the Aventine figure as the Foundry officers seem to have a bit more heft than the rank and file. The small Redoubt range look similar in size to Aventine to me, but a bit different in their proportions. Stylistically I think they are a better match for Foundry.


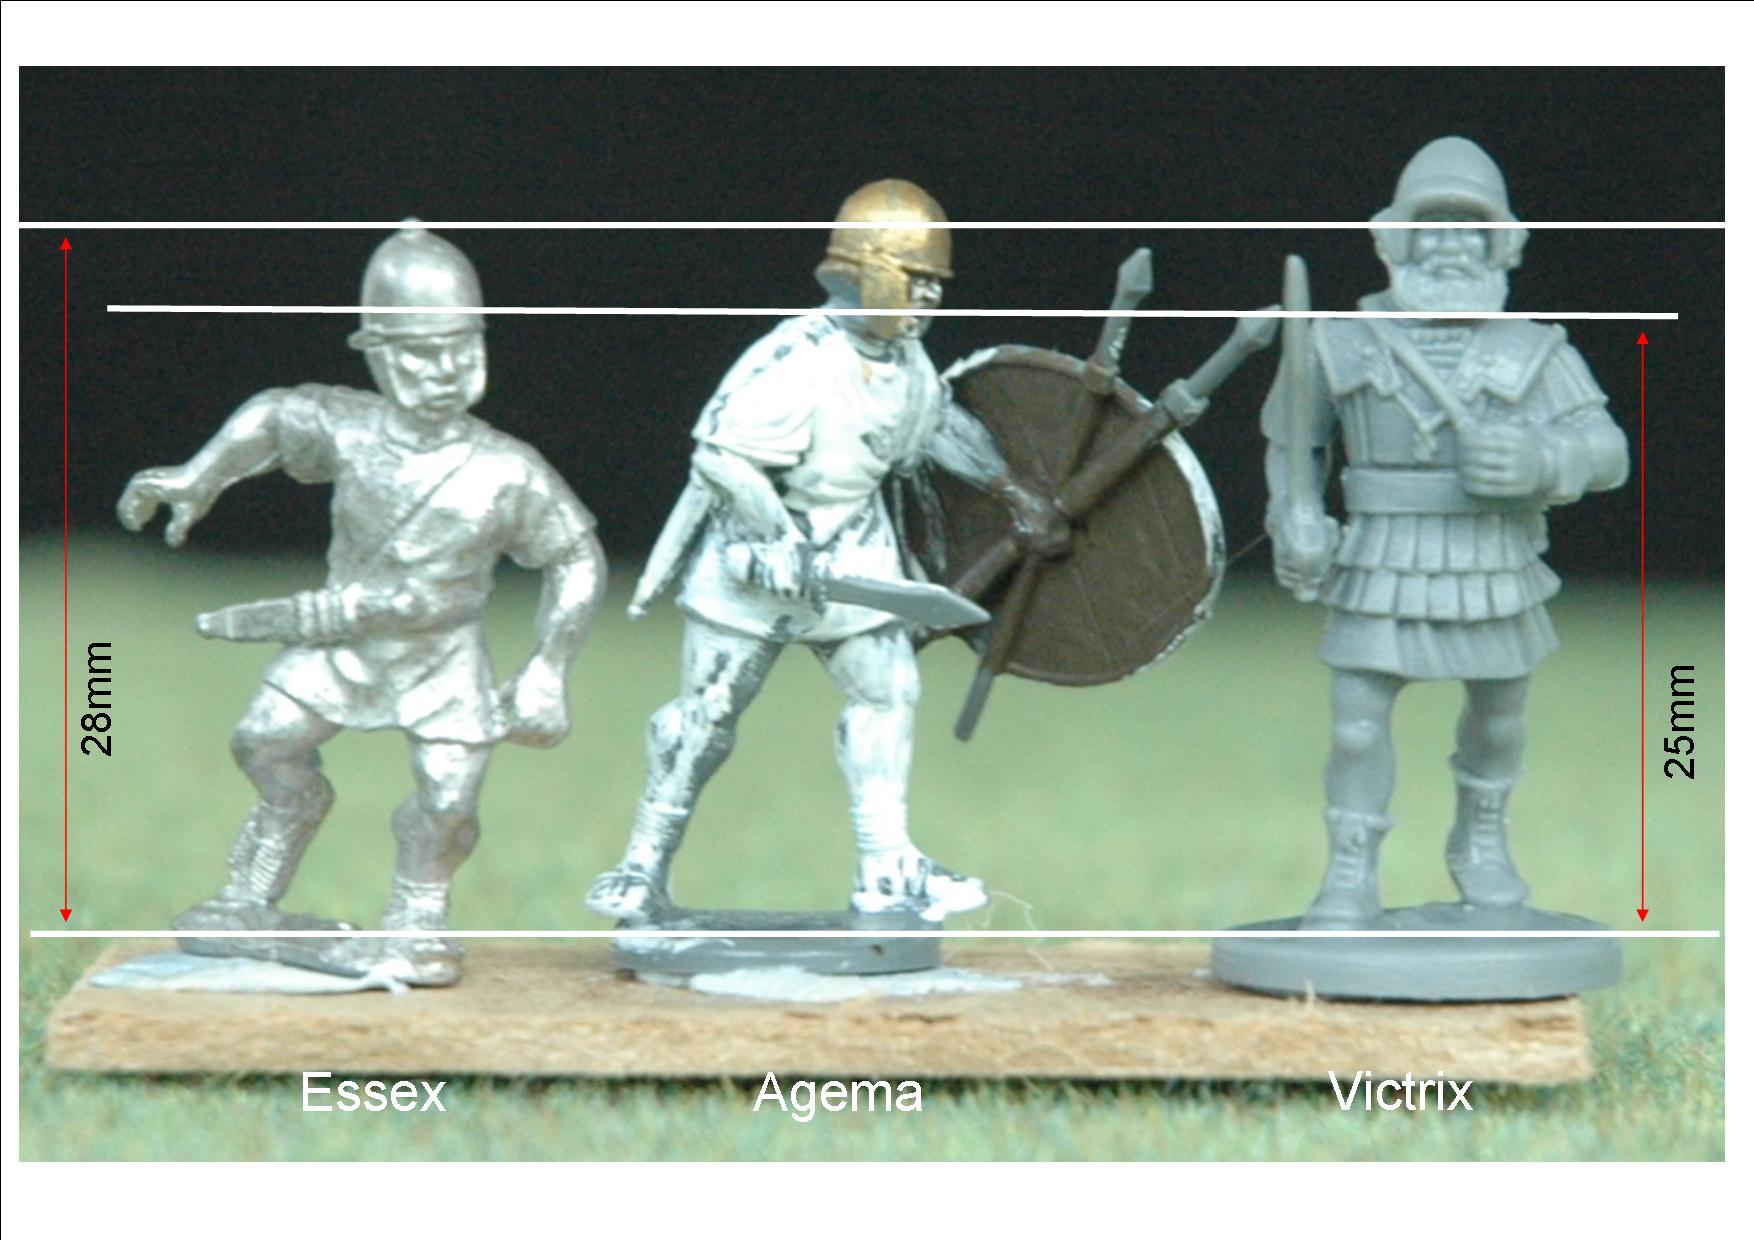
As I mentioned the plastic sets of figures that are coming on line, I thought it only fair to show them some examples. The Agema Velite is, like  its metal stablemates quite tall and slim, less tedious than some plastics to clean up and glue together and a great basis for conversions. (Which IS what plastic figures are for!) As the Victrix Romans are not quite available yet, a Greek hoplite is shown for comparison purposes. Not quite as proportionate but usable together (if not swapping heads and other body parts.)  The Essex Velite is shown as yet another option for this army. These are fairly recent sculpts and whilst on the short side quite nicely done.


There are many "legacy" ranges that contain Republican Romans (e.g.Minifigs, Garrison, Hinchliffe and Warrior) but the arrival of cheap plastic figures means you have to want the nostalgia or maverick, "old skool"  style choice to plumb for these options. There are also several out of production ranges such as the previously mentioned Renegade, "now you see them, now you don't" Companion Miniatures and Sussex/Corvus Miniatures. So much current choice though their loss is not a disaster. Choice can only be a good thing  if gotta have them all tendencies can be avoided (I struggle with that one.) I think that the photos above illustrate that a mixture of ranges can work very well in an army.

Truceless War Campaign - First Battle

The Truceless War was the conflict that occurred between the 1st and 2nd Punic Wars when Carthage made a disastrous hash of paying off its largely mercenary army. The mercenaries mutinied and things soon turned bloody when they ransacked Carthaginian towns and the Libyan subjects of Carthage revolted and threw in their lot with the mercenaries.


This war had always seemed like fascinating subject matter for a wargames campaign and offers an interesting mixture of troop types that we already have available from our Hellenistic and Punic Wars collections. The absence of the Romans (apart from their historical, small and late intervention) should make battles less formulaic and wide open too.


I put together a simple boardgame style set of campaign rules taking some ideas from Piquet's "Theatre of War" campaign system (the reason I did not want to just use ToW is that as a card driven system it is difficult to use as an ongoing email campaign; the players really need to be in the same room, which would eat into our gaming time.) Another Piquet system that I drew on heavily is the Band of Brothers army generation mechanism, which is called "Bang the Drum" (BtD.) This uses a standard playing card deck to select an army from a roster up to a preset total of points (they call them Florins.)


I like this as a campaign mechanism as it allows armies to be recorded as a points total without keeping track of individual units with any particular force. In BtD the spades cards that are drawn are used to upgrade training and weaponry if points have been allocated in these areas, otherwise they are wasted cards. I used the spades column on the roster to incorporate supply, diplomacy and the chance of mercenaries deserting. I wanted these issues to be a bit abstracted but an always present factor for the players.


I scribbled my rules and the army generation tables down, borrowed a part of the map from the excellent boardgame Hannibal by Valley Games and handed it out to the players. I didn't get any negative feedback from our little group (I am sometime not sure they can even read mind you...) So the campaign was kicked off and the players pondered and eventually handed in their first week's orders. I took on the role of Hanno the Great (not so great historically) so that we would have 2 a side. I started by stitching up my fellow Carthaginian general, Hamilcar, by swearing blind I was going to stay in Carthage that turn, and promptly marched out with the garrison to attack the nearest Mercenary rebel.


The neighbouring city of Utica was in a state of unrest which made it vulnerable to swapping from Carthaginian controlled to backing the Mercenaries.  The presence of a Mercenary army outside its walls under Spendius the Italian increased this chance too. I decided that the loss of resources represented by this city was too great a chance to take, thus the headlong attack by Hanno. Luckily for Hanno/me, the Mercenary players had split their resources almost equally between their three active generals and Spendius had spent less than half his share in recruiting soldiers. Knowing only the total value of the relieving force (including supply, diplomacy etc.) Spendius decided to stand firm and try to repel the enemy  to maintain his siege.


Hanno's 3 points of recruitment gave him 30 Florins to generate an army on the BtD table (here.) His other points had gone on Pay: 1, Diplomacy: 2 and Supply: 1.


The cards were kind for Hanno and the army generated included 10 cheap but effective units, including 2 of elephants! The spades drawn were more of a mixed bag.

Pay: D6 versus desertion (usually a D4)

Diplomacy: 50% of enemy mercenaries vulnerable to desertion.

Supply: 50% of units out of supply!!! (Obviously didn't realise how much fodder elephants require on a route march!)


Spendius' 2 points gave him 20 Florins to spend on the table (here), which gave him: 2 units of Numidian cavalry, 2 units of Libyan spearmen (one of them levy) and a unit of Spanish Scutarii. The spades gave

Diplomacy: 2 enemy units vulnerable to desertion

A strategy: Heroic commander. The sole Mercenary sub general is an inspiring commander, no units need take a morale test whilst he is on the field but he is at greater risk of dying if he leads a unit in combat. Useful against those elephants...


The armies deploy.


A tall order for the Mercenaries to hold the field, even with their palisaded camp to defend and to make it worse I forgot to include their Spanish unit on the rosters (doh!)  The game was short and just about as disastrous as it could have been!  Half of the Mercenary Numidian cavalry were chased off the battlefield by Keltic foot warriors and the other half slowly engulfed by enemy cavalry whilst they sat there ineffectually. The elephants (despite being weakened by their lack of food and water) stormed into the Mercenary camp and trampled all over Libyan spearmen. The charismatic general routed away with them. A counter-attack by Spendius himself at the head of the remaining spearmen sent the elephants packing (and straight back towards the Carthaginian foot) but the Carthaginian Spaniards charged in turn and cut to pieces this final unit and killed Spendius during the fight!


Elephants break into the Mercenary camp.


Luckily for Spendius we will have to refight this one with all the soldiers present. We will perhaps increase the FLorins total to 15 per Recruitment point budgetted so that we get slightly larger games to fight.


The death of Spendius the Italian?


Punic Wars Game - part 2

Our latest game was a re-run of part of the large Punic Wars game we played last year. On the previous occasion we played through the initial ambush part of the game but did not have the time to fight the head of the Roman column versus the blocking Carthaginian force.


The Roman Legions formed up for battle.


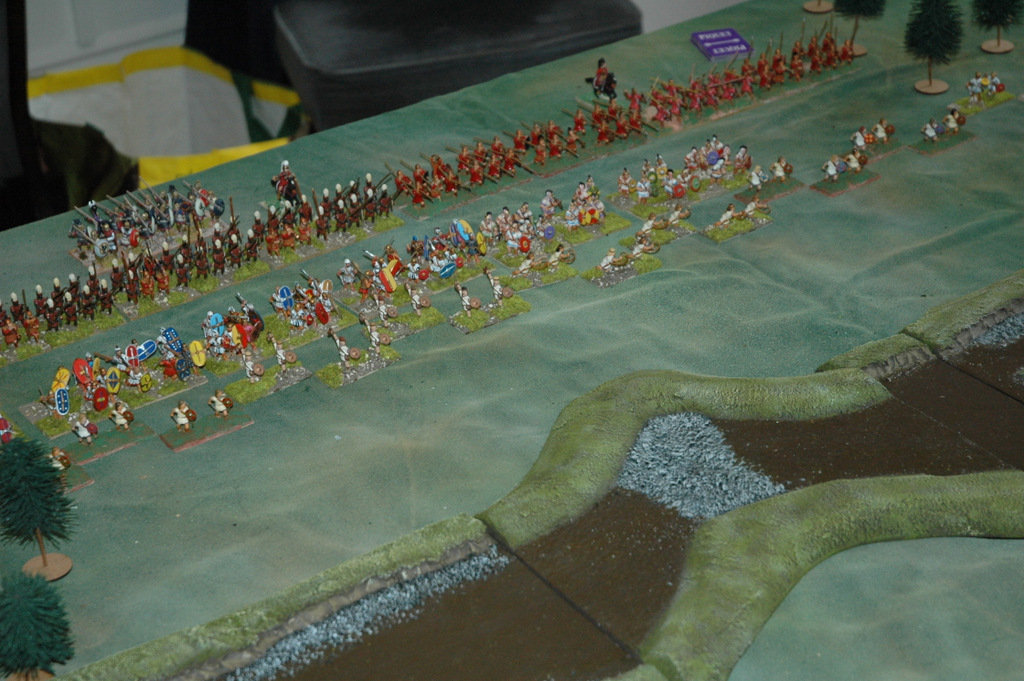
This version started before the Romans had managed to cross the river and was the first outing of our new (much wider) river.  The Romans had two full legions formed up on the table and a promise of reinforcements coming in turn 4.  Opposing them were 34 units of Carthaginians, comprising mainly Spanish Scutarii and close order spearmen (presumably Libyans/Liby-Phoenicians.) These were formed up in depth in the gap between the woods, facing the Legions and also as a flanking force threatening the Roman left. Thus the Romans found themselves outnumbered 2 to 1 (at least at the outset) the only bright point being that there relatively few Carthaginian cavalry to be concerned about.


The Carthaginian hordes!


Facing such odds and a river in the way the Roman commander decided to discard convention and attack! (That flanking Carthaginians were preying on my mind and the quality of the reinforcements did nothing to inspire waiting around!) The Romans were deployed in Triplex Acies with both flanks resting on the woods and the legion cavalry following on behind the Triari. As they pushed forwards one legion’s worth of Triari wheeled to face the woods on the left with support from the cavalry. They would have to deal with the flanking attack when it turned up.


The Punic flanking force arrives.


The advance was swift and soon the Velites were wading across the shallow river. They faced a tough fight when they exited the opposite bank; Balearic slingers were thrown back but the fierce Spanish Caetrati defeated half the skirmish line and the Hastati were forced to move up and deal with them.  In their wake fierce warbands of Spanish Scutarii hurled themselves at the Roman lines. Their deep formations crashed into the thin line of Hastati but before they could cut their way through the Legionaries they received devastating volleys of pila. This disrupted many of the barbarian charges before the Romans set to work with their short swords.  The savage fighting eventually ended with all the Spaniards thrown back or fleeing but at the price of all the front ranks' pila and with half the Hastati needing to be relieved by the following Principes.


Skirmishing Velites lead the way followed in turn by Hastati, Princepes and Triari at the back with their long spears.


It was now that the survivors of the other Roman legion arrived unheralded behind their comrades. A welcome reinforcement, unlikely to get to the front lines and do any fighting  but bringing new heart and fortitude to the front lines (and 14 morale chips! ) The depleted Legions were however within a short march of the last line of the Punic army, an unbroken phalanx of densely packed Punic spearmen. Many of these were well equipped veterans, easily the match for Roman legions. After a brief pause to reorganise their formations the Romans continued their advance.


Skirmishing Balearic slingers lead Gallic mercenaries into the fight. Behind them the veteran Libyan spearmen.


It was now that the flanking force arrived on the left of what was now the Roman rear. Six units of infantry and two of cavalry were advancing against a rearguard of one unit of Triari and one of Equites. The leading units of Spanish mercenaries advanced into contact with the Romans and checked to find out their basic combat values. Naturally they discovered that they were the absolute cream of the Carthaginian army a D8 unit and a D10 unit (a 20 on a 20 sided dice.)  The fierce Spaniards charged home only to be repelled and routed by the brave Triarii!

With more Roman reinforcements arriving all the time the Punic spears nearest the main Roman line charged for glory and with numbers, depth and impetus on their side looked like achieving it. The gods of fortune had decisively swung behind the Romans however, as Scipio's veterans broke twice their number of Carthaginian units cutting their way through the enemy battle line and winning the day!


As usual we were playing Archon 2, a Piquet supplement and as usual it gave a gripping battle. As the Roman commander I felt the situation was hopeless from the outset and my ability to throw 1s on any dice you care to mention (including D12s) was starting to confirm the assessment! The initiative came my way at the crucial moments though, allowing the Romans to use their one-shot pila volleys to good  effect. This and their line replacement enabled the Roman attack to keep up its impetus and despite the cavalier use by the Carthaginians of their huge pile of morale chips, the battle slowly tipped towards Rome. The climax of the battle when the Romans had cut their way through to the best of the Punic troops, and the flank attack finally arrived,  was decisive in the main due to my dice rolling coming good; I managed to roll only 7s and 8s on an 8 sided dice for the final six combats.


Rearguard Action

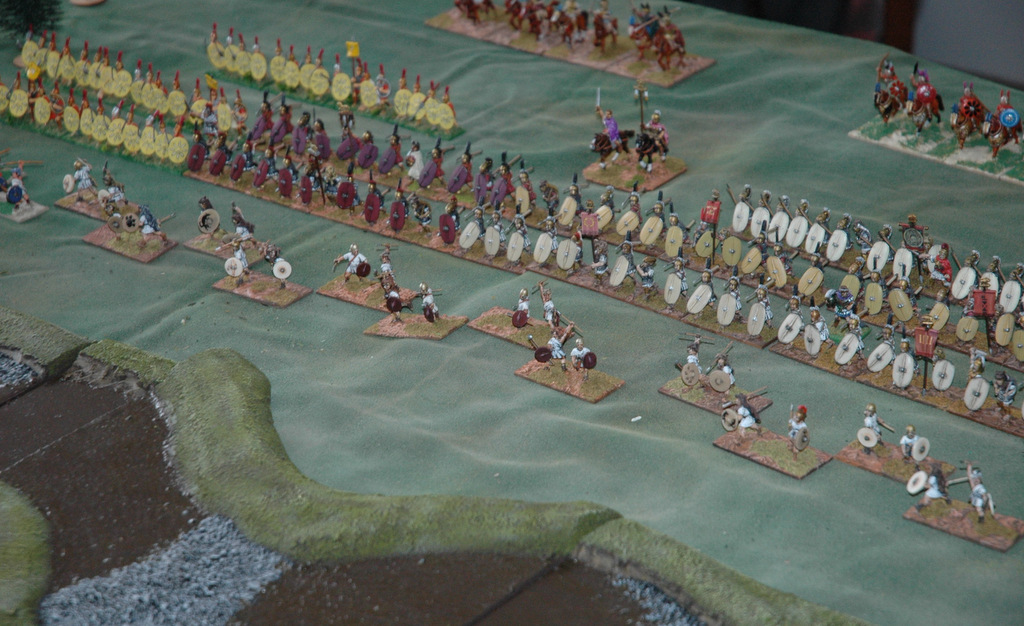
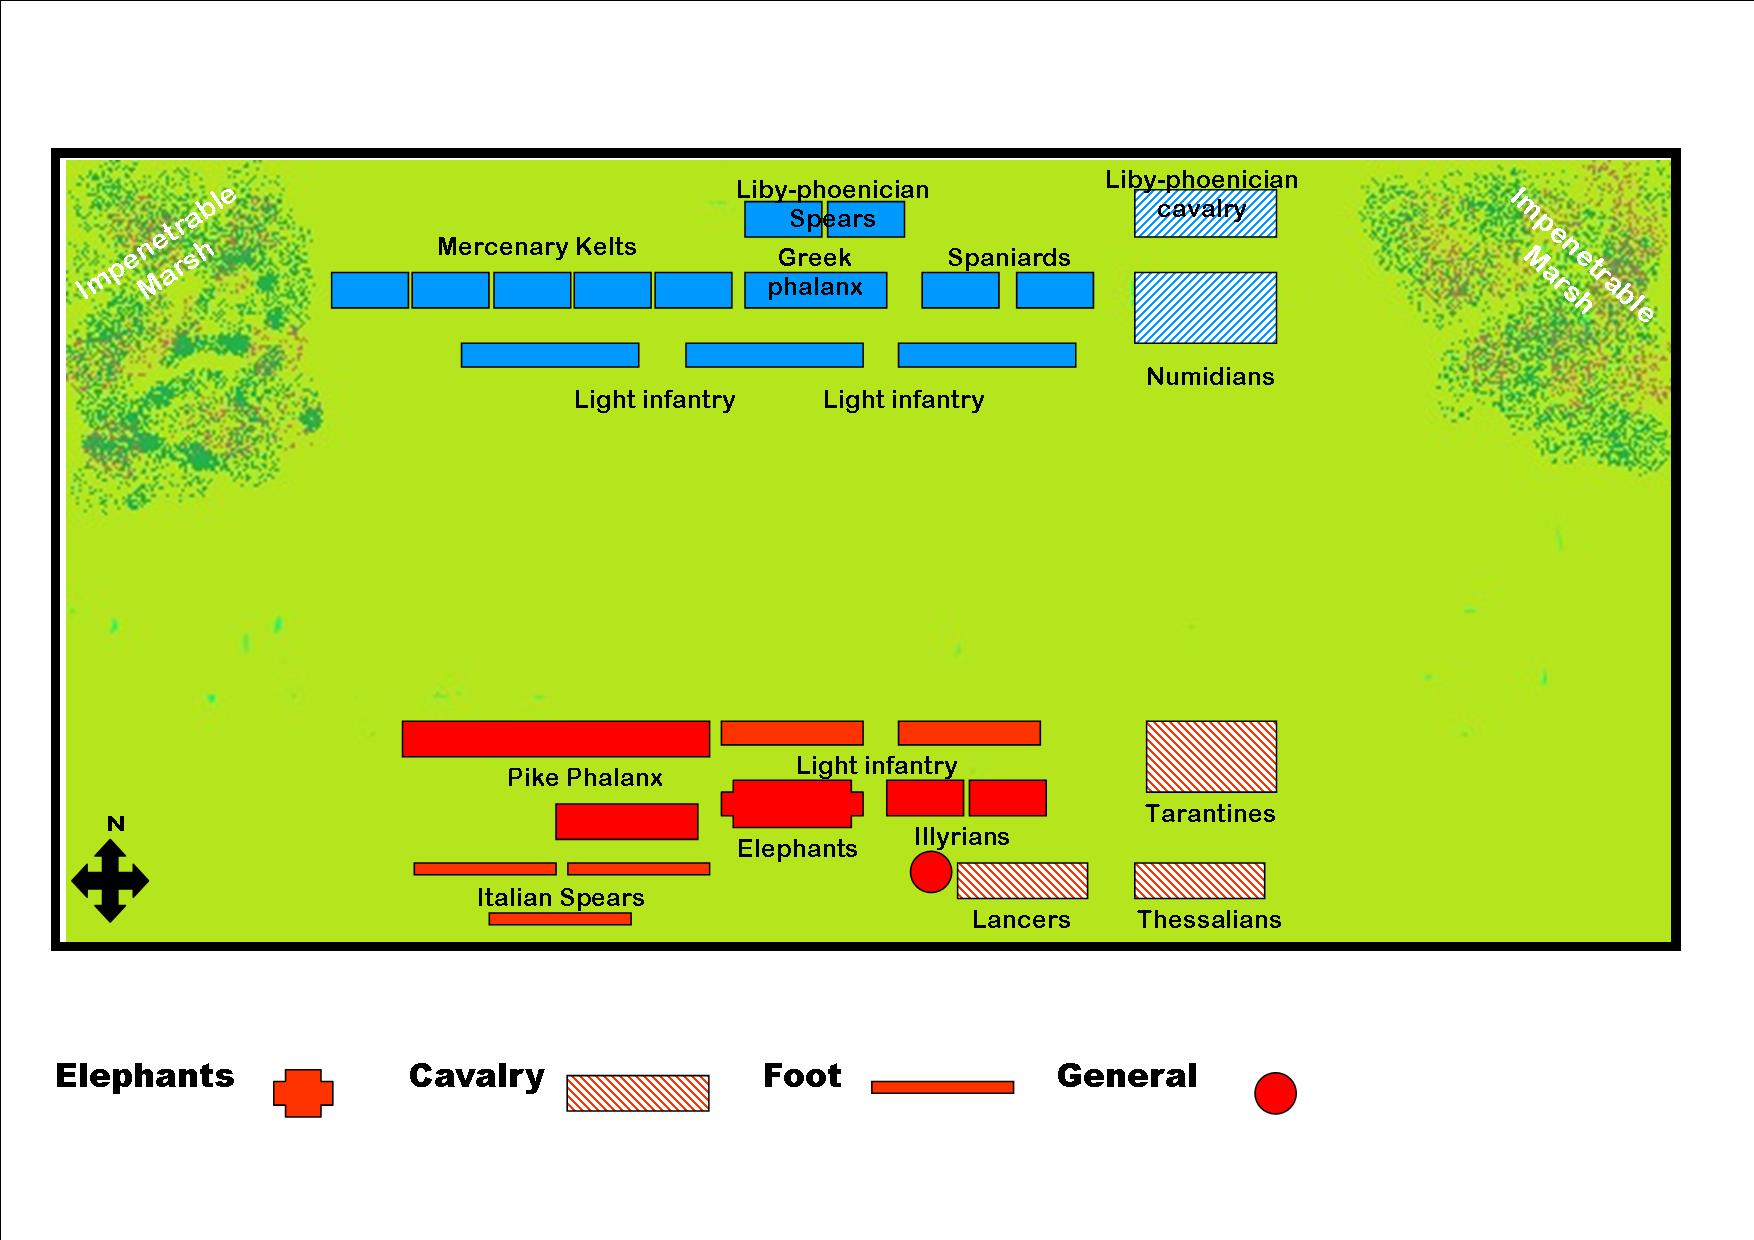
 The battle described by Nick below, was interesting as an example of asymmetric victory conditions. We rarely these days fight the straight encounter battle, that can be thought of as the typical wargame and this one was a rearguard action by a Carthaginian force trying to defeat or delay the Advance Guard of Pyrrhos. The Pyrrhic army had the sole objective of breaking through the Carthaginians and exitting the table; their real interest being the retreating main Punic army beyond. The Pyrrhic army only drew 21 morale chips at the start of the game so had the potential to be quite brittle, if they suffered any early reverses. They did get a Brilliant Leader card and a Strategem card for addtional reinforcements though.


The points of interest in this game to me were:


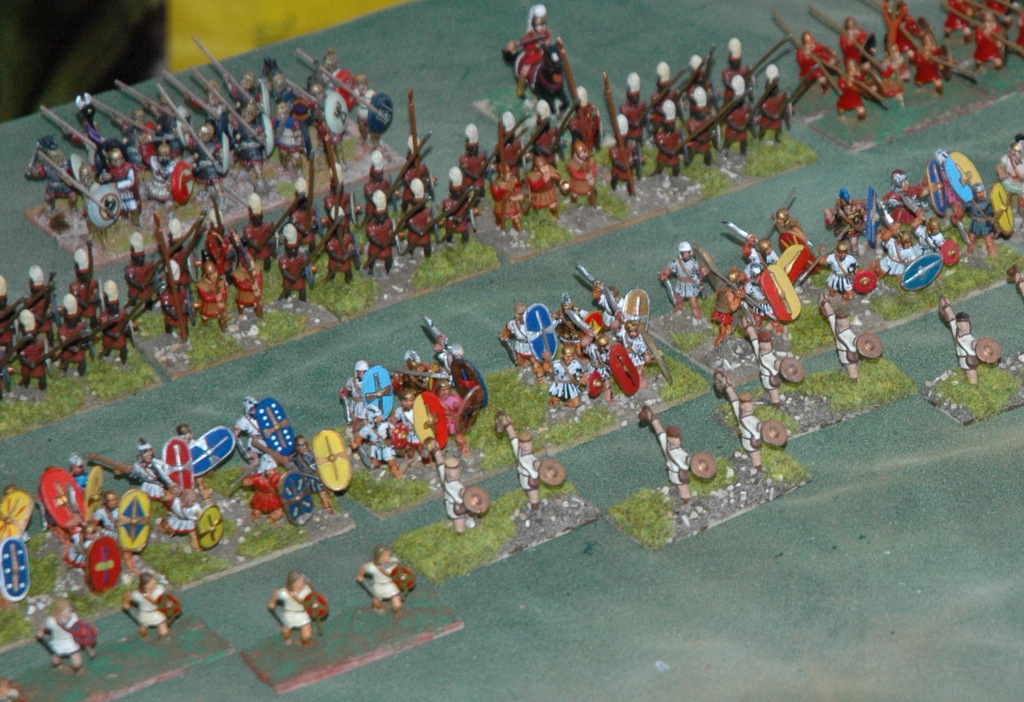
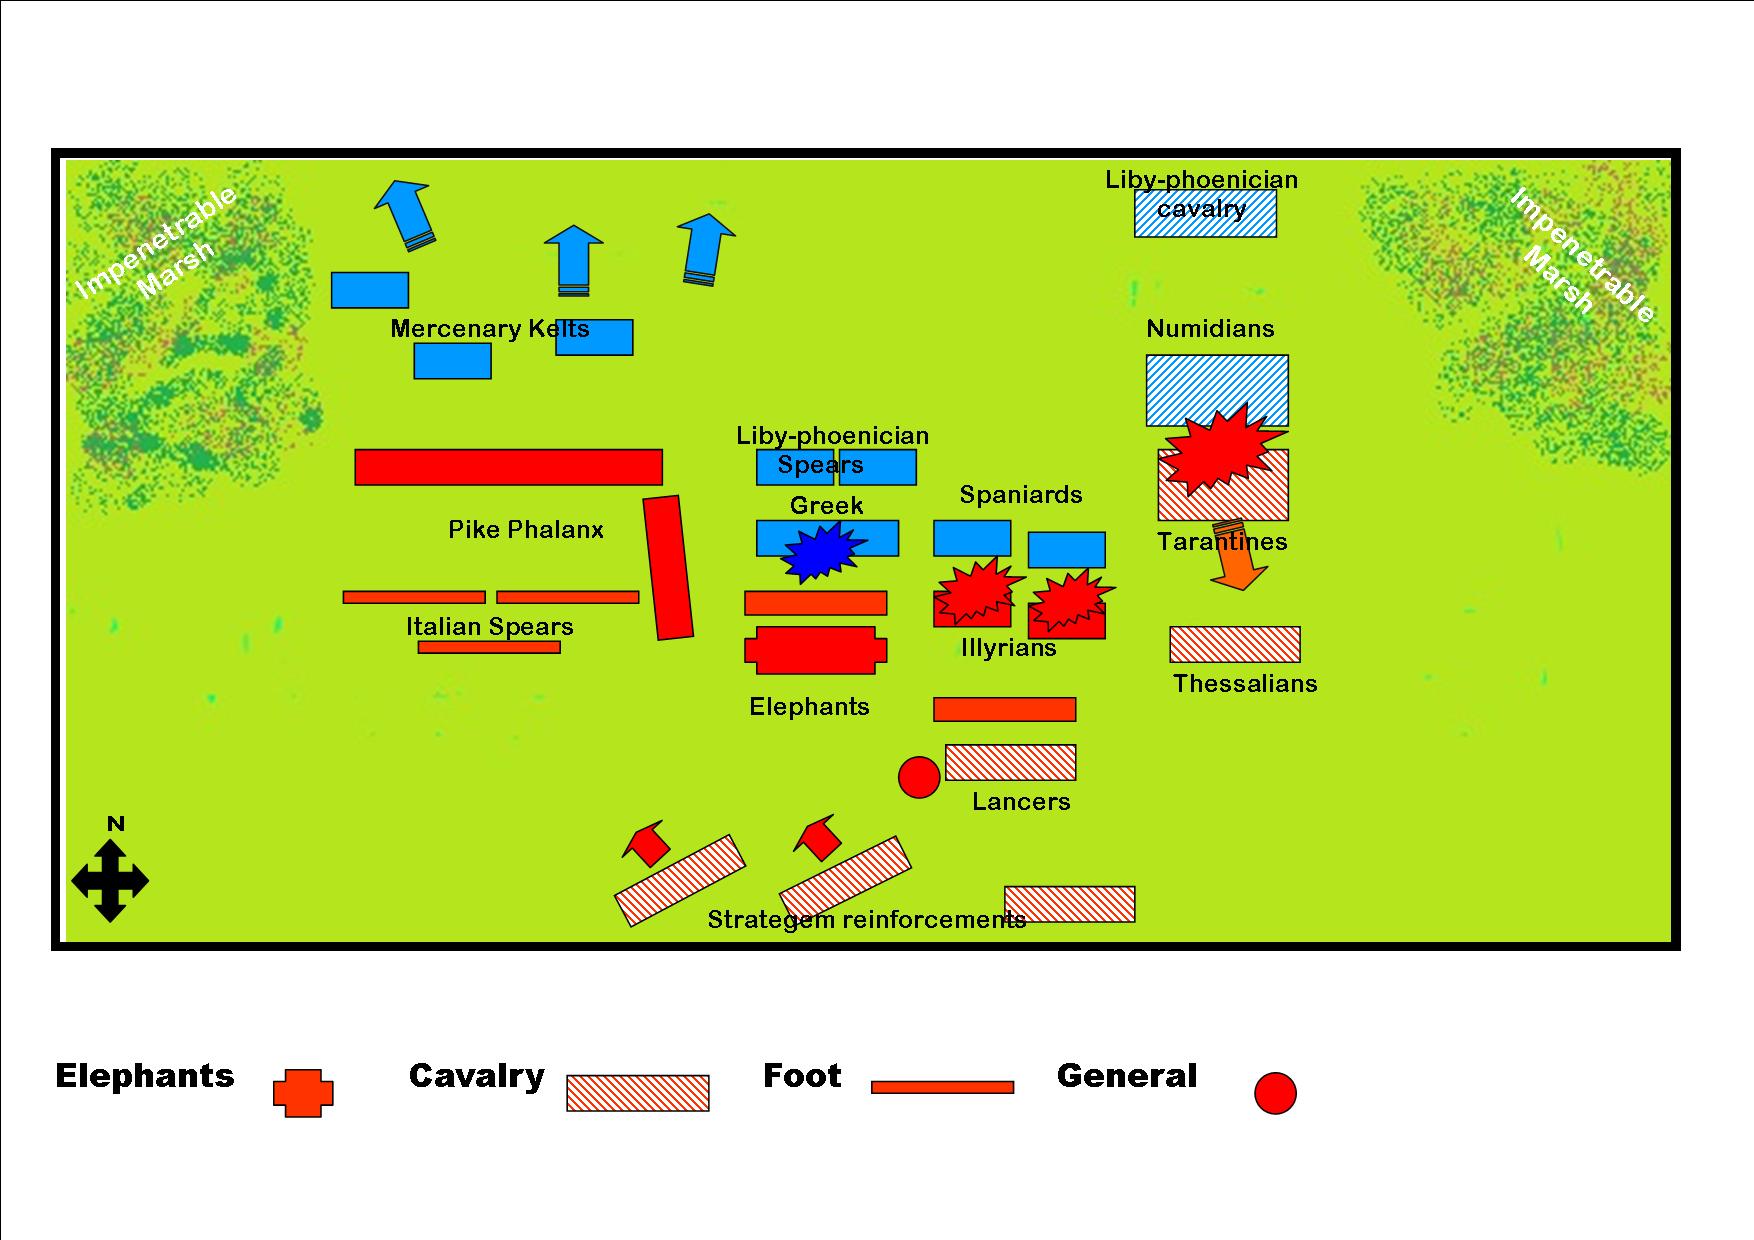
1. A plan that actually executed as intended. The idea was to punch a hole with the phalanx and then seal off the enemy battleline with the second line of pikemen, leaving a corridor for the bulk of the Pyrrhic army to funnel through. The success of the plan was greatly helped by the failure of the morale of the Keltic mercenaries. This rang true, as they had been flung forward out of their defensive position between the impenetrable marshes, right into the teeth of the advancing Pyrrhic phalanx. Only one Kelt warband stayed to fight the pikemen and that didn't go well for the brave lads. The pikes then just had to keep pressing forwards, brushing aside skirmishers and preventing any Kelts from rallying (the General of the skirmishers died valiantly trying to reform his Moorish light infantry.)


After that the second, shorter line of phalanx laboriously wheeled 90 degrees to seal off the hole in the Carthaginian line and then assisted the elephants in breaking the Greek hoplite phalanx. Reverses for Pyrrhos on other parts of the battlefield were irrelevant as they could not prevent the main objective and were too limited to threaten the Pyrrhic force.


2. A re-enactment of an episode in one of our earliest games of Piquet, where a player (who shall not be named*) used their spare cards in place of their deck proper. Only spotted after around the third morale check card had been drawn. This time eyebrows were raised on the Pyrrhic side of the table when a second Brilliant Leader card was drawn (a very powerful wildcard) and then the error was spotted by the GM. Luckily it didn't affect the way the game panned out on this occasion but we will be reminding the player about it for some time.


3. One of the most successful uses of elephants I have seen on a wargames table. The single unit  combined their intimidation and harassing archery to great effect.


(*it was Nick)


Nick's take on the Battle - A Pyrrhic Victory?


Tasked with fighting a rearguard action while the main body escaped, the Carthaginians occupied a flat area of land with impossible terrain anchoring both left & right flanks. The Carthaginians right wing contained 4 units of Gauls & 2 units of javelinmen. These faced a Pyrrhic phalanx 4 units wide & backed up by another 2 units in phalanx. The Punic centre was led by a mercenary Greek phalanx, 2 units strong. The Sacred band followed in support. These brave souls prepared to take on the frightening sight of Pyrrhic elephants, trumpeting loudly as they showed their eagerness to charge into battle. Supporting the elephants were a variety of peltasts & psiloi. Left Centre was held by more Gauls & 2 units of Spanish foot. The Punic left flank was held by 3 units of horse, including Numidians.  These faced 3 Greek cavalry units.


Opening movement saw a general advance by both sides. The most aggressive move was by a unit of Greek Tarentines which moved rapidly up on the Punic Numidians - a move they regretted & which ultimately led to their annihilation. With the centre & right now in close proximity to the enemy, the Punic allied Gauls now checked for proximity to fearsome opponents (phalanx & elephants). The Gauls did not like this & a number withdrew in disorder. The Greek phalanx advanced steadily & the Carthaginians again checked their morale (drew another COURAGE card). More Gauls routed or ran back in disorder. The Greek phalanx advanced, the Elephants advanced. The Greek mercenaries withdrew. The battle was lost!


As a consolation, the Punics Spanish allies chopped up some Pyrrhic Peltasts